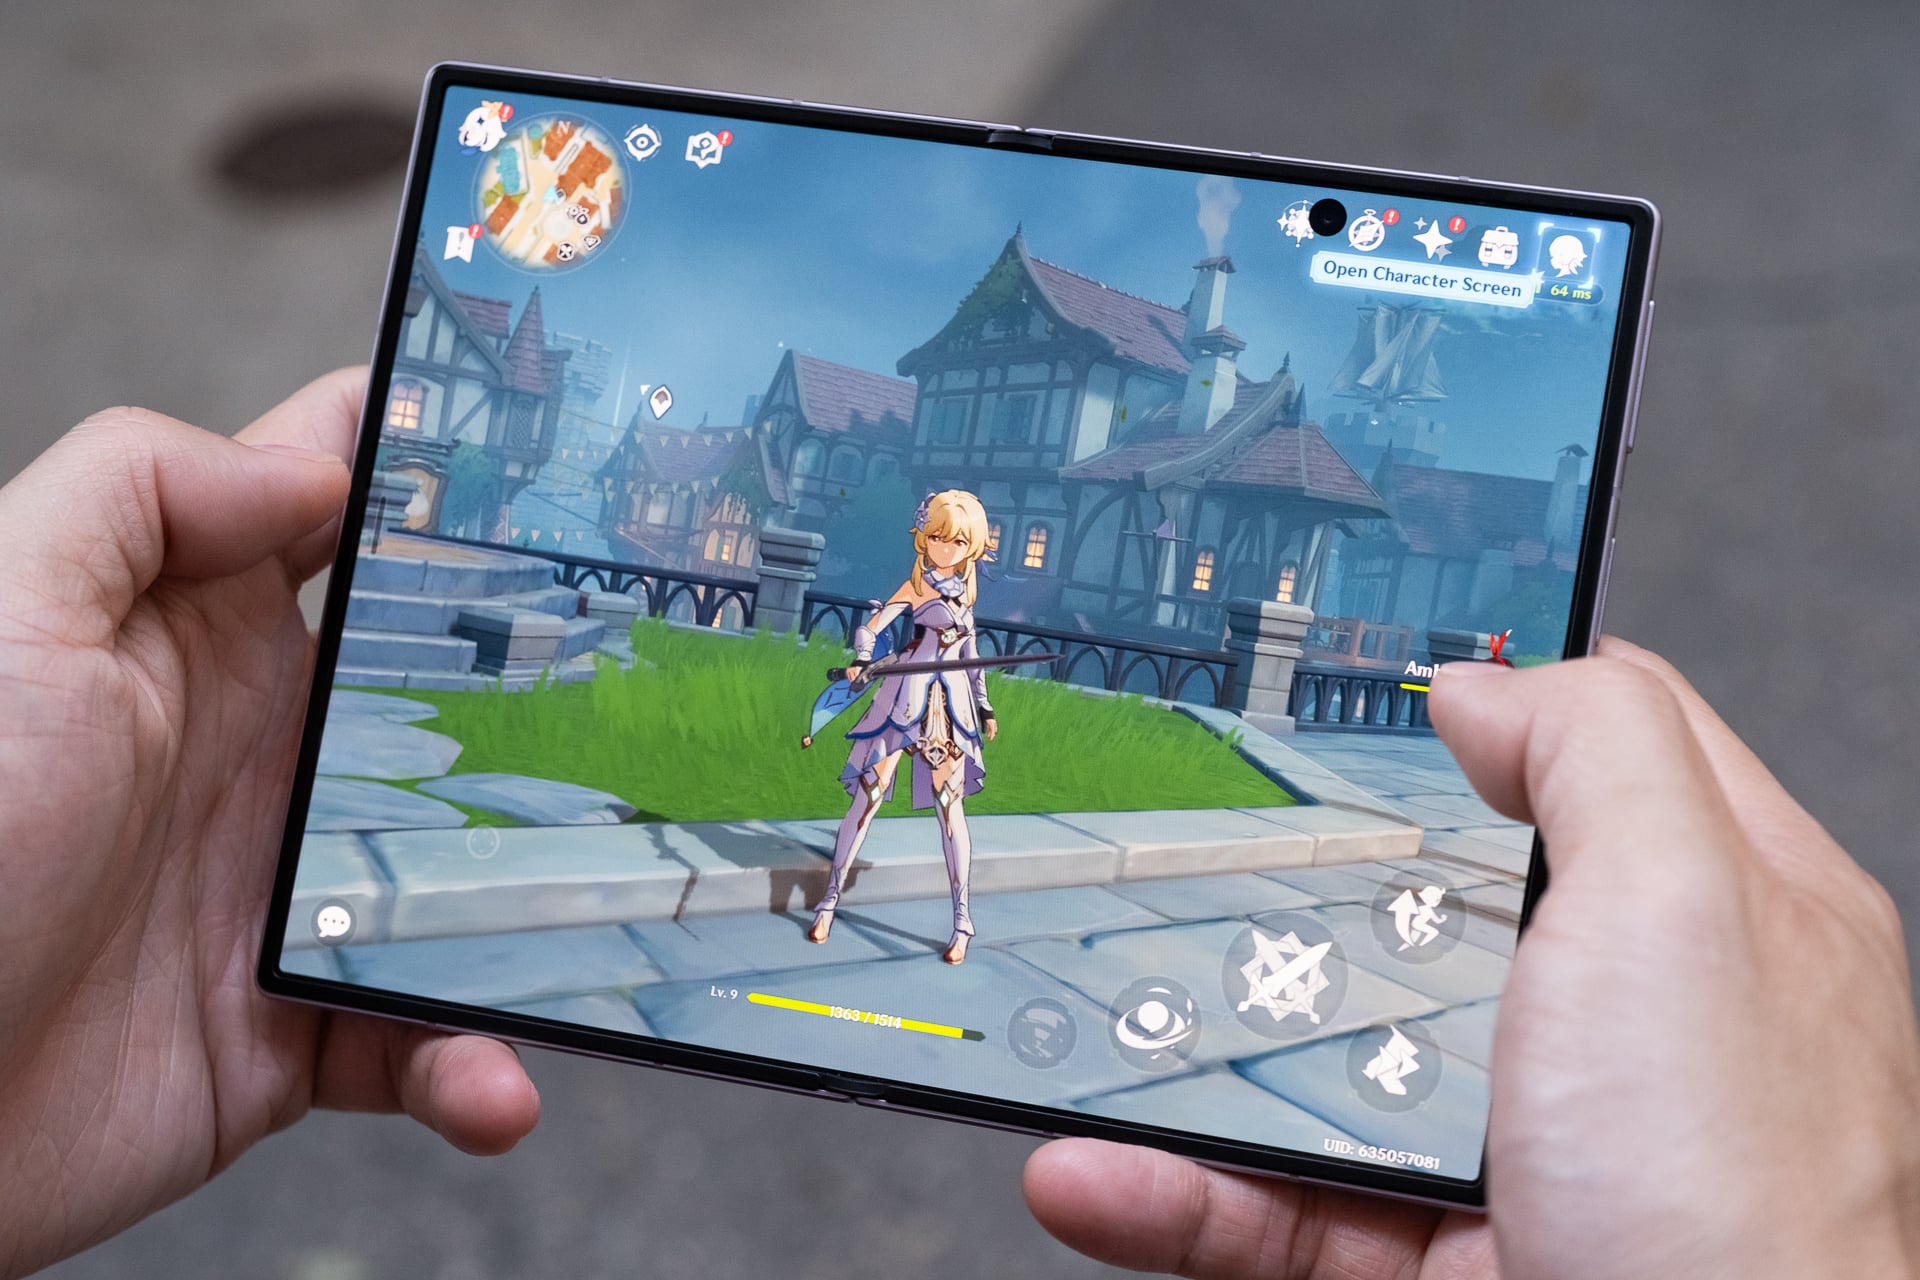
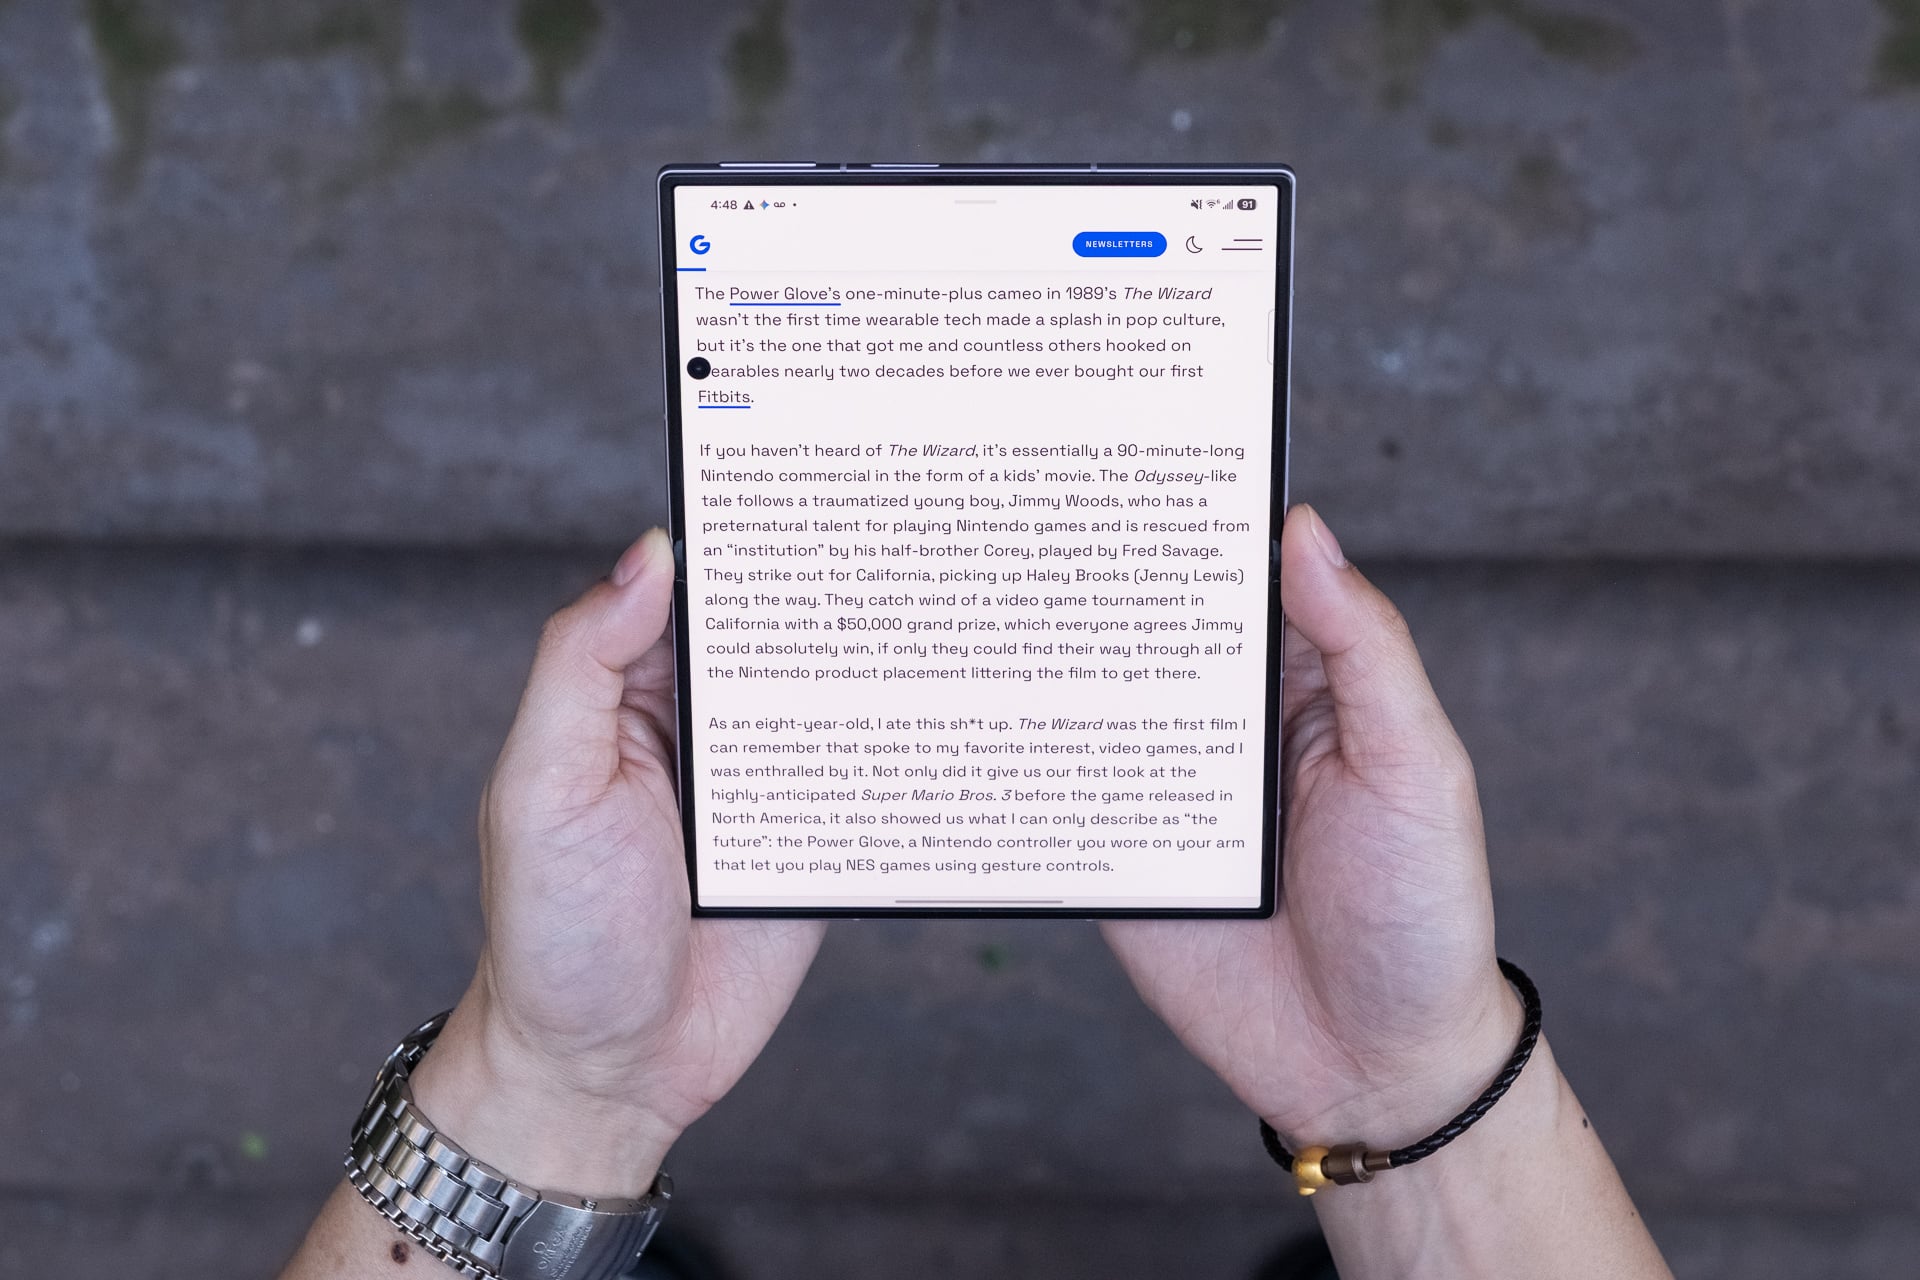
Samsung’s Galaxy Z Fold 8 is the best phone (not just foldable) I’ve ever used for consuming content—watching videos, playing mobile games, reading, and yes, even doomscrolling social media—thanks to its 7.6-inch inner screen.
The book-style foldable phone’s novel shape when closed may look strange at first, but I promise you that its shorter and wider footprint (when closed) quickly feels normal after a few days. The whole point of this form factor is to unfold it for its larger tablet-sized screen, and I can assure you that you’ll be doing that often because the experience encourages it more.
More importantly, the Z Fold 8 has fewer of the compromises that held back Samsung’s previous foldable phones. The device is lighter and easier to unfold, the battery is bigger and lasts all day, and Samsung has greatly reduced the crease on the inner screen.
Some apps still might not display correctly on both screens, but even so, I’m declaring the Z Fold 8 a home run. I can’t stop using it.
Samsung Galaxy Z Fold 8
The Galaxy Z Fold 8 is Samsung’s best version of a book-style foldable phone yet, even with its premium price.
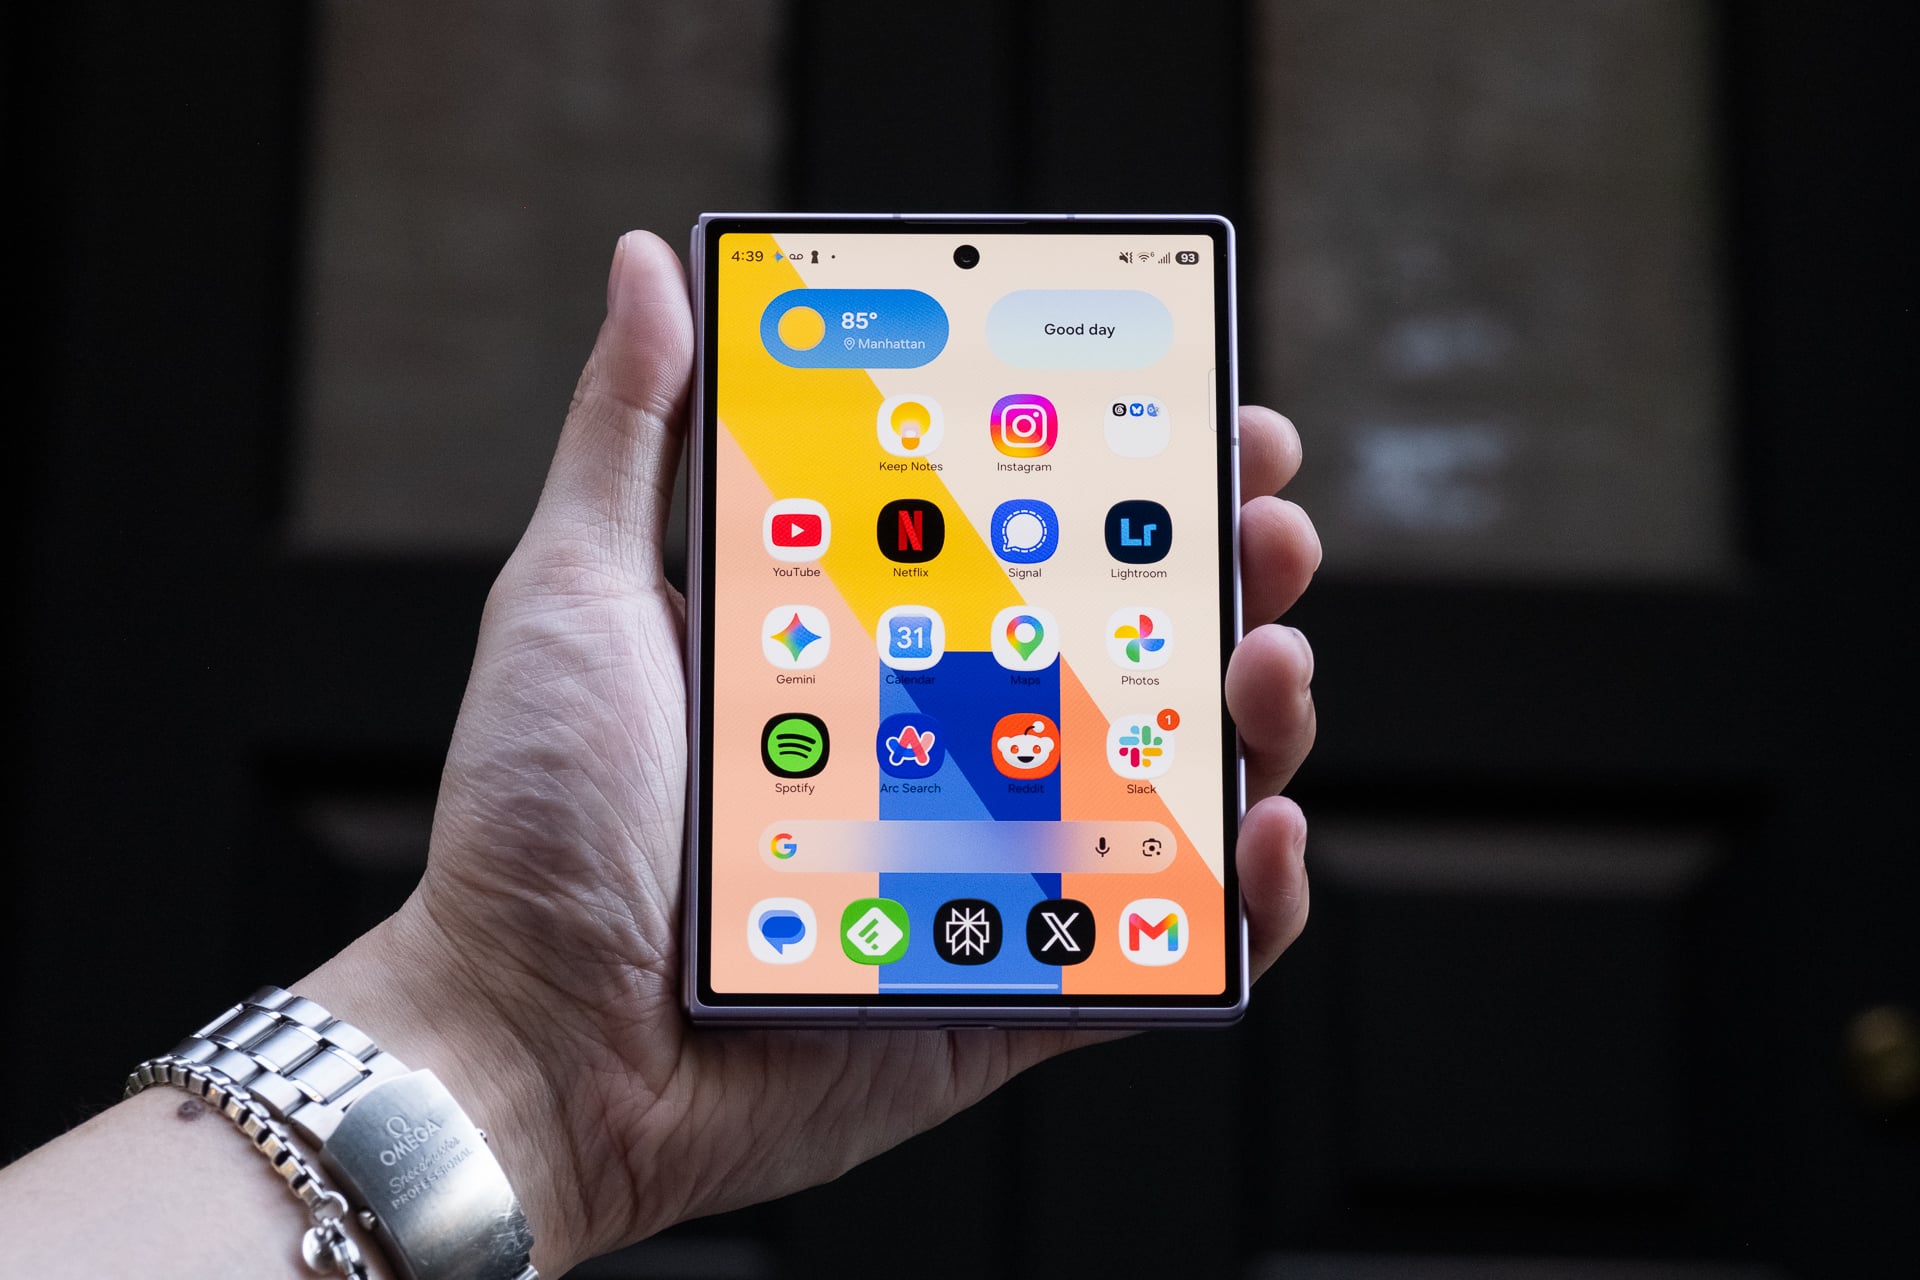
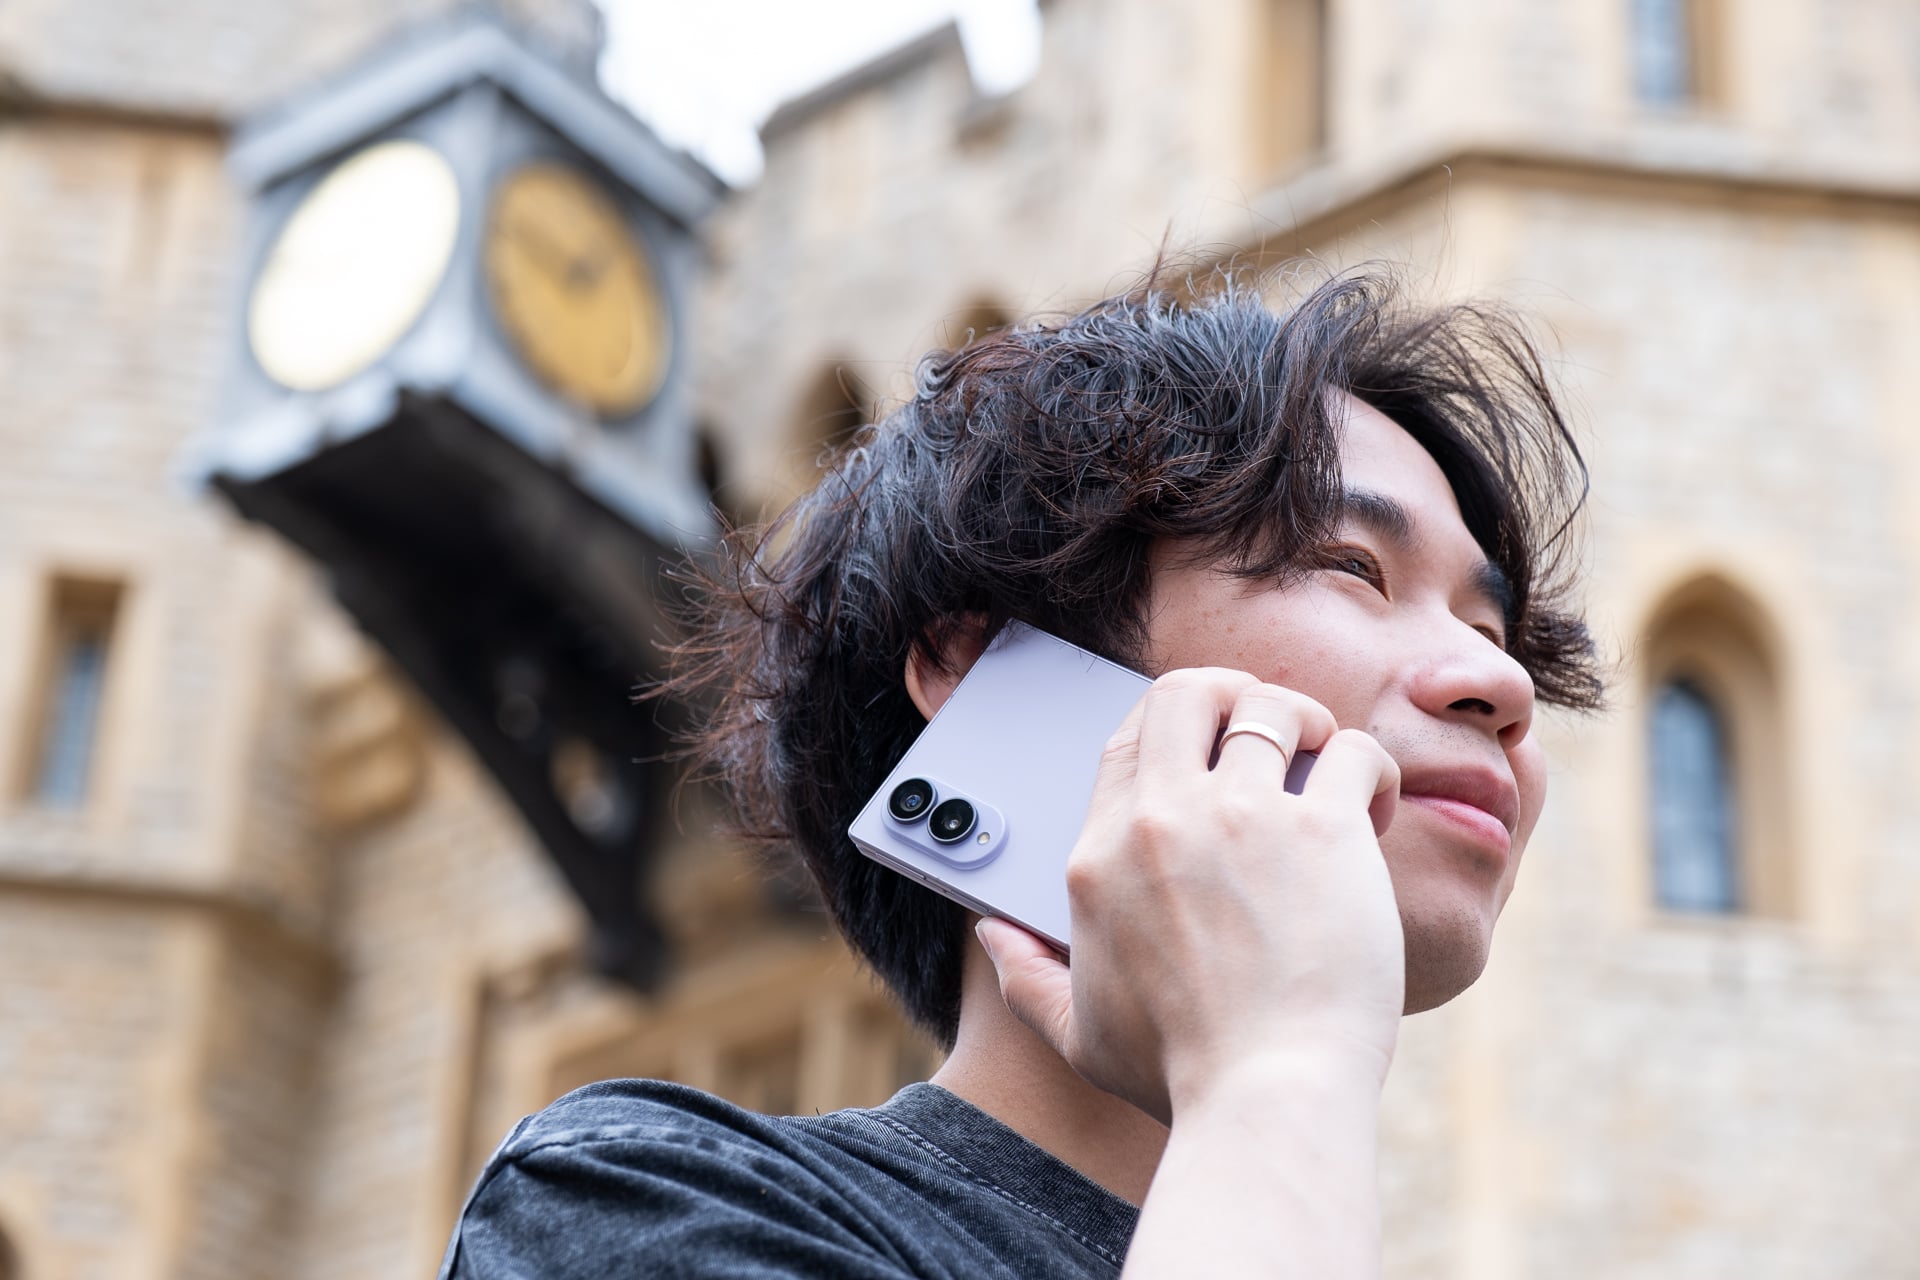
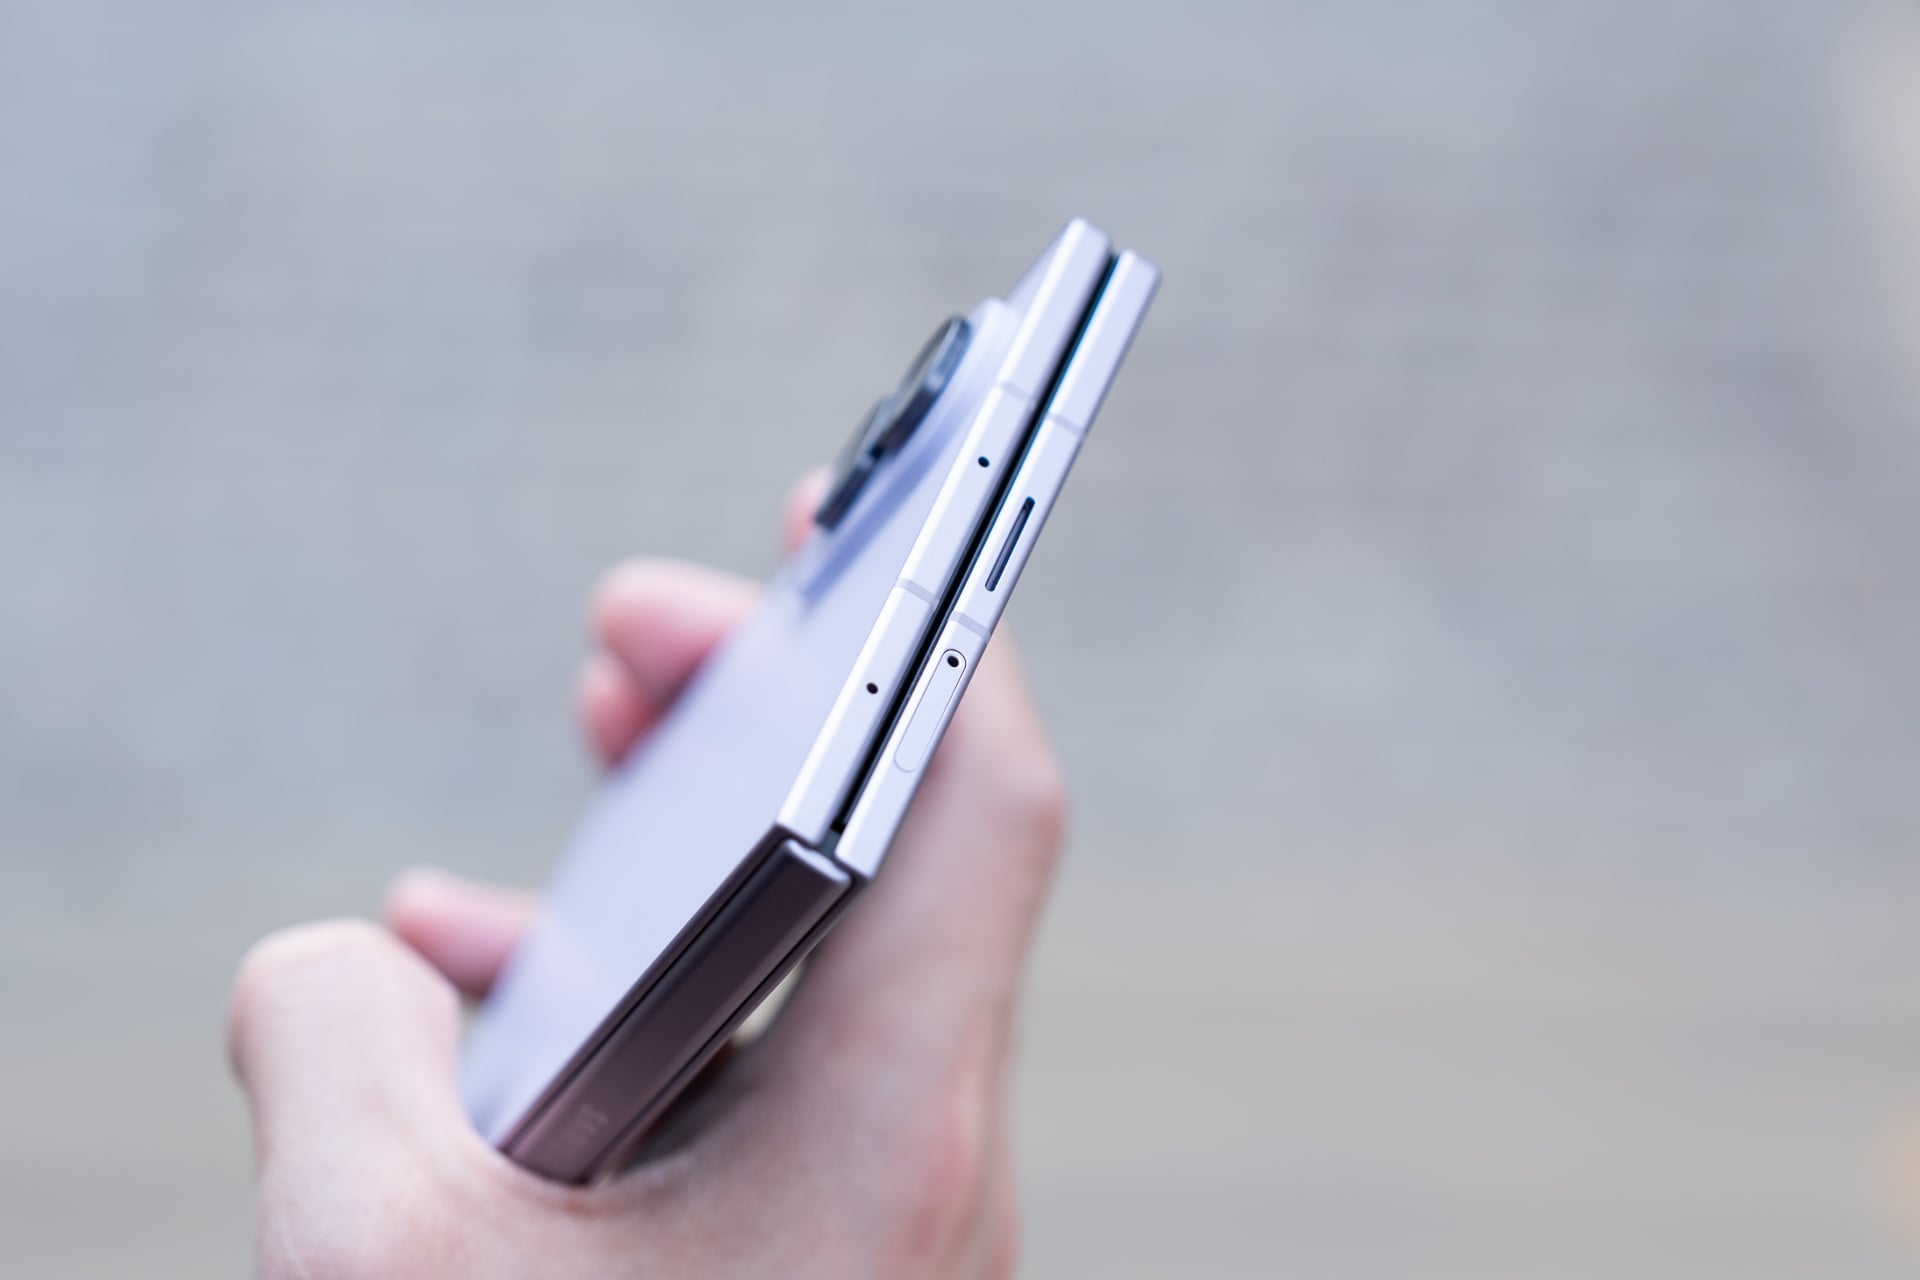
The best size comparisons for the Z Fold 8 are a passport or a B7-sized notebook. The foldable measures 4.88 x 3.24 inches when it’s closed. It’s a few hairs thicker than the Z Fold 8 Ultra, but because of the squatter dimensions and lighter weight, the Z Fold 8 doesn’t feel unwieldy. I’m mostly able to reach corner to corner on the 5.5-inch AMOLED cover screen, something I haven’t been able to do on any “regular” (read: 6 to 6.9-inch) bar-style phone in years.
It also fits in my front pants pockets better than expected; I had concerns that the width might be too wide. I guess if you’re already used to the width of an iPhone 17 Pro Max or a Galaxy S26 Ultra, the Z Fold 8’s only slightly wider.
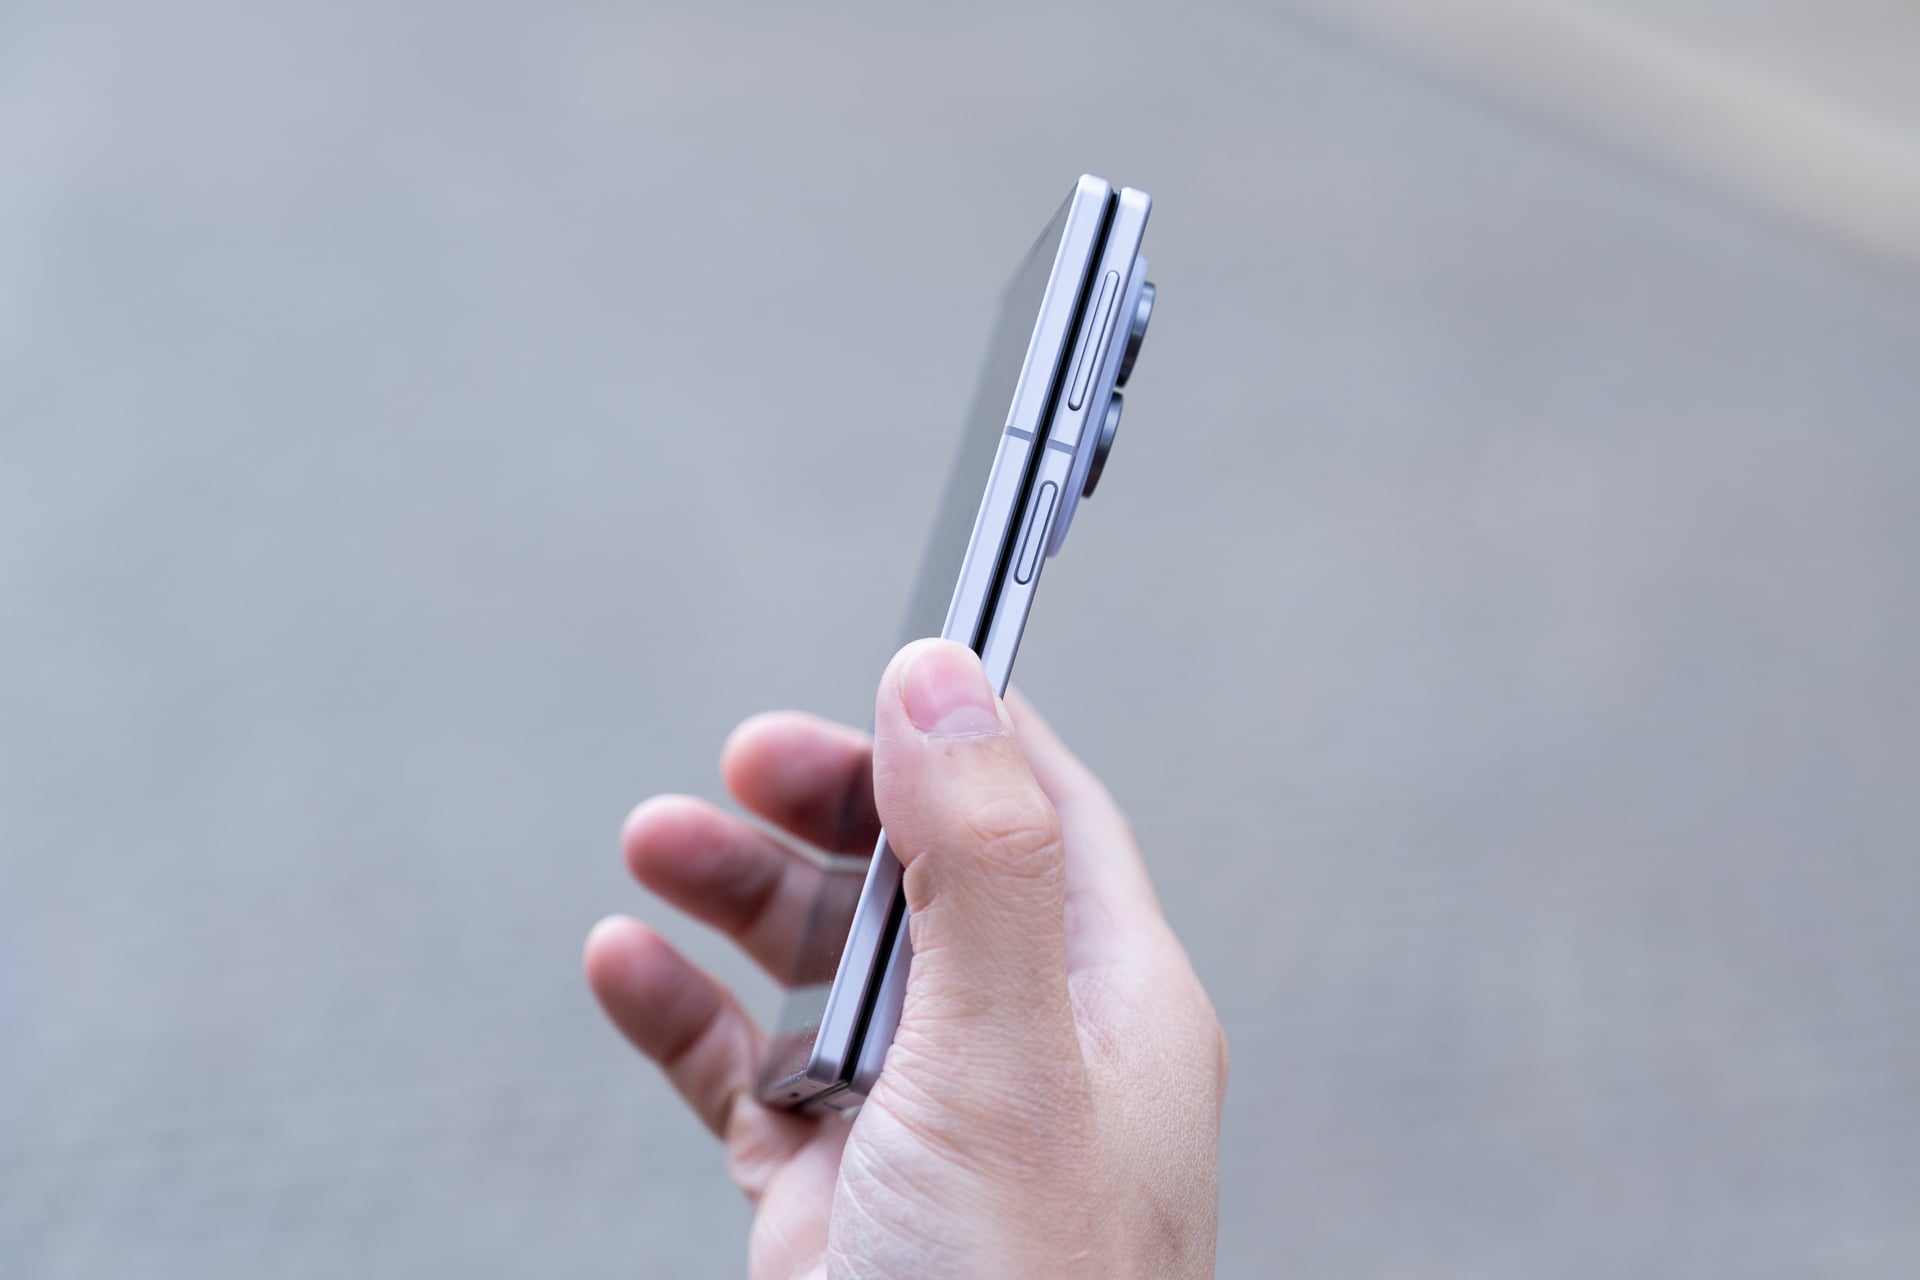
I’m able to reach the power button/fingerprint reader easily with my right thumb. Lefties might struggle since they can’t use their thumb and will have to register their index finger, which might be a little stretch to press the button, like it is for me. The volume rocker is a little high for me; I prefer its lower position on the Z Fold 7/Z Fold 8 Ultra. Typing with two hands on the cover screen is a much easier affair than on narrower phones; I made fewer typos compared to my iPhone. One-handed typing will depend on whether your hand is large enough and your thumb can stretch across the keyboard.
The 10:16 aspect ratio of the cover screen is also not as cramped as it seems. You lose vertical space compared to most regular phones and taller foldables like the Z Fold 8 Ultra, which means apps will show less and you’ll need to scroll more, but that’s mostly a non-issue if you open the phone and rotate it to vertical orientation. I never found myself bothered that I couldn’t see enough on the cover screen. If anything, I appreciated the shorter screen more because I didn’t feel compelled to pull it out as much unless I wanted to unfold it.
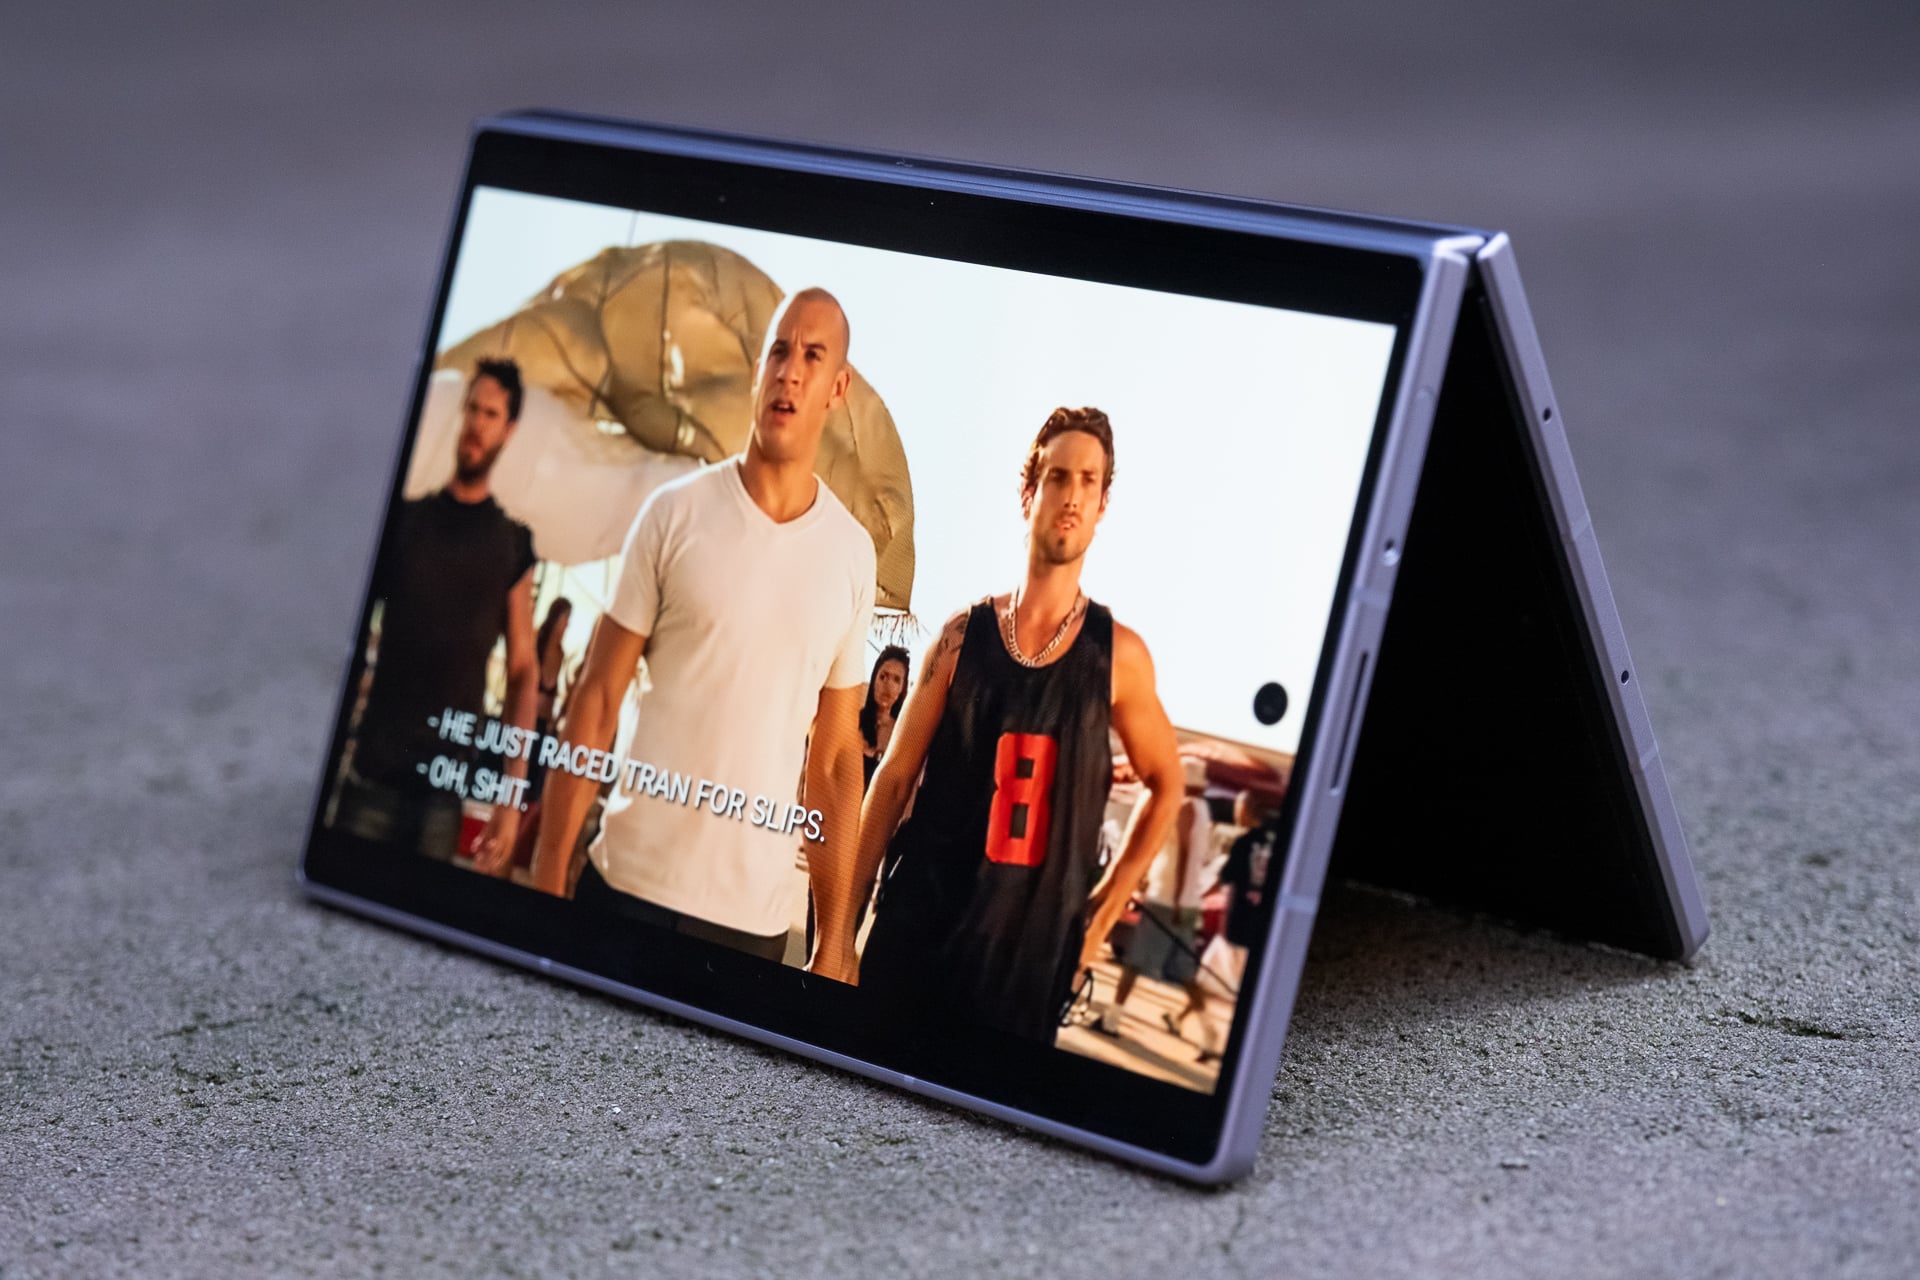
Like on the Z Fold 8 Ultra, you can use the Z Fold 8 in “tent” mode. This is great for propping up the device on a plane tray table or if you’re just too lazy to hold it up while in bed. I fly a lot for work, so tent mode is something I find very useful. A Z Fold 8 Ultra feature that you won’t find on the Z Fold 8 is “Flex mode.” On the Z Fold 8 Ultra, you can snap the screen so that it resembles a baby laptop, and some apps, like YouTube, will display the video above the crease and controls below it. I never found much utility for Flex mode on the previous Z Folds and I don’t miss it on the Z Fold 8. If that’s something you care about, get the Z Fold 8 Ultra instead.
Out of all the book-style foldable phones I’ve tested over the past seven years, the Z Fold 8 is the only one that I have unfolded more times than I have not. With each generation of Z Fold, Samsung made the dimensions more like a regular bar-style phone. I heaped praise on the Z Fold 7 for finally ditching the previous skinny, remote-like shape. And even though I considered the Z Fold 7 my favorite Android phone of 2025, I realized that I only used its inner screen maybe less than 50% of the time I pulled it out. With the cover screen being normal-sized, there just wasn’t as much of a need to unfold it for the 8-inch screen.
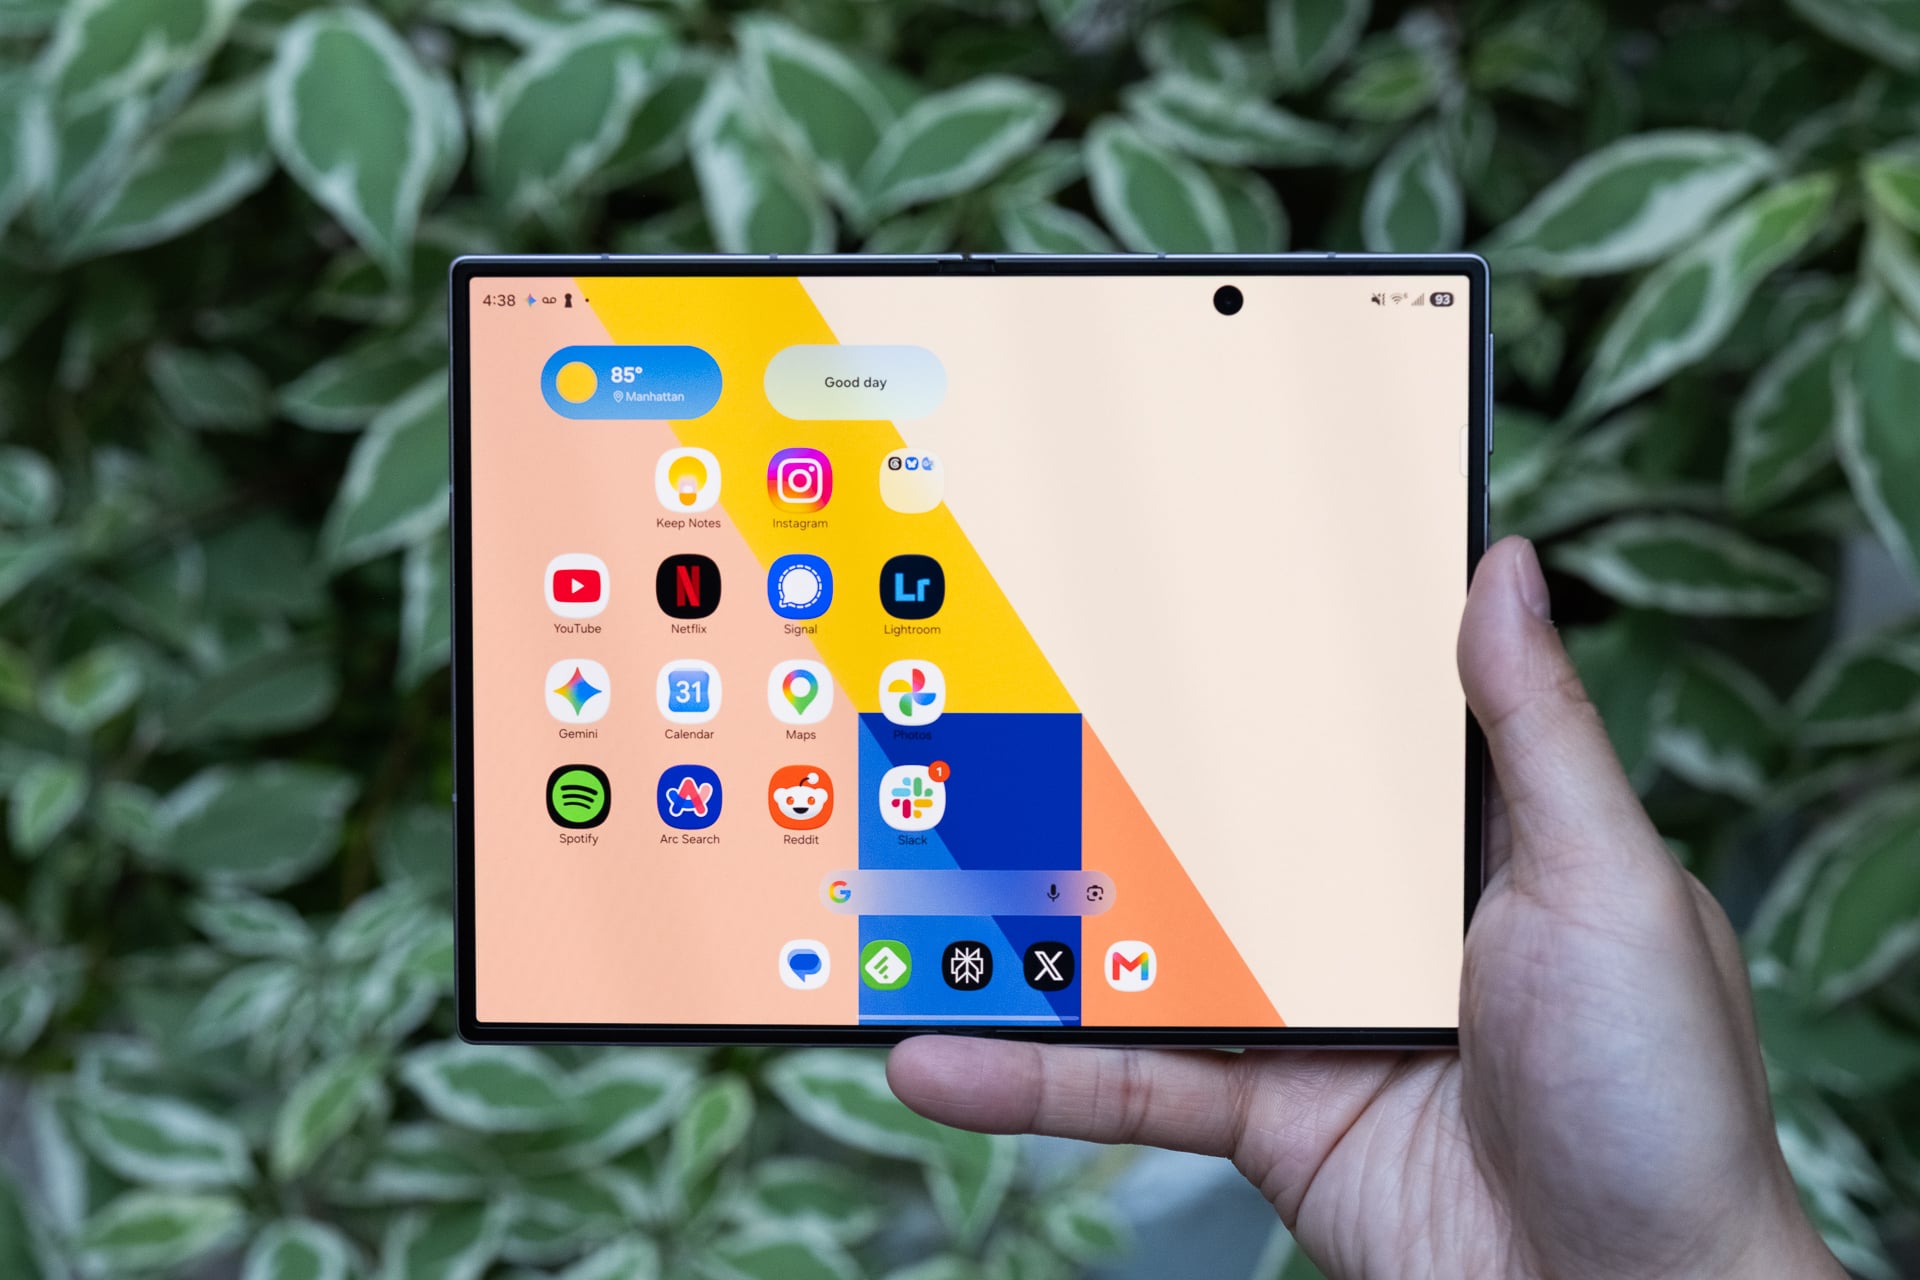
That hasn’t been the case with the Z Fold 8. Because of the shorter cover screen, I almost always unfold it to use the larger display. Maybe that’s because the Flex Titanium technology helps the hinge spring open better or the beveled aluminum frame makes it easier to unfold without needing fingernails, or both. Whatever the reasons are, it’s easier to see and feel the benefits of the larger size of the inner screen’s 4:3 aspect ratio for most content than on a more square-ish folding screen like the Z Fold 8 Ultra’s. To get roughly the same diagonal screen for widescreen videos on the Z Fold 8 Ultra, you need to rotate it, which is an extra step. It’s a tiny bit of friction that makes the task of quickly unfolding and getting more screen real estate less convenient. When you’re unfolding the phone dozens of times a day, that one extra step adds up.
After two weeks of using the Z Fold 8 and Z Fold 8 Ultra, I’ve concluded that if you watch more videos and game more than you read, the Z Fold 8 is the better foldable since you won’t need to rotate it so much. If you do more reading and split-screen multitasking, the Z Fold 8 Ultra is more suitable since you’ll get more vertical display on both the cover and inner screens without rotating, and you’ll do less scrolling.
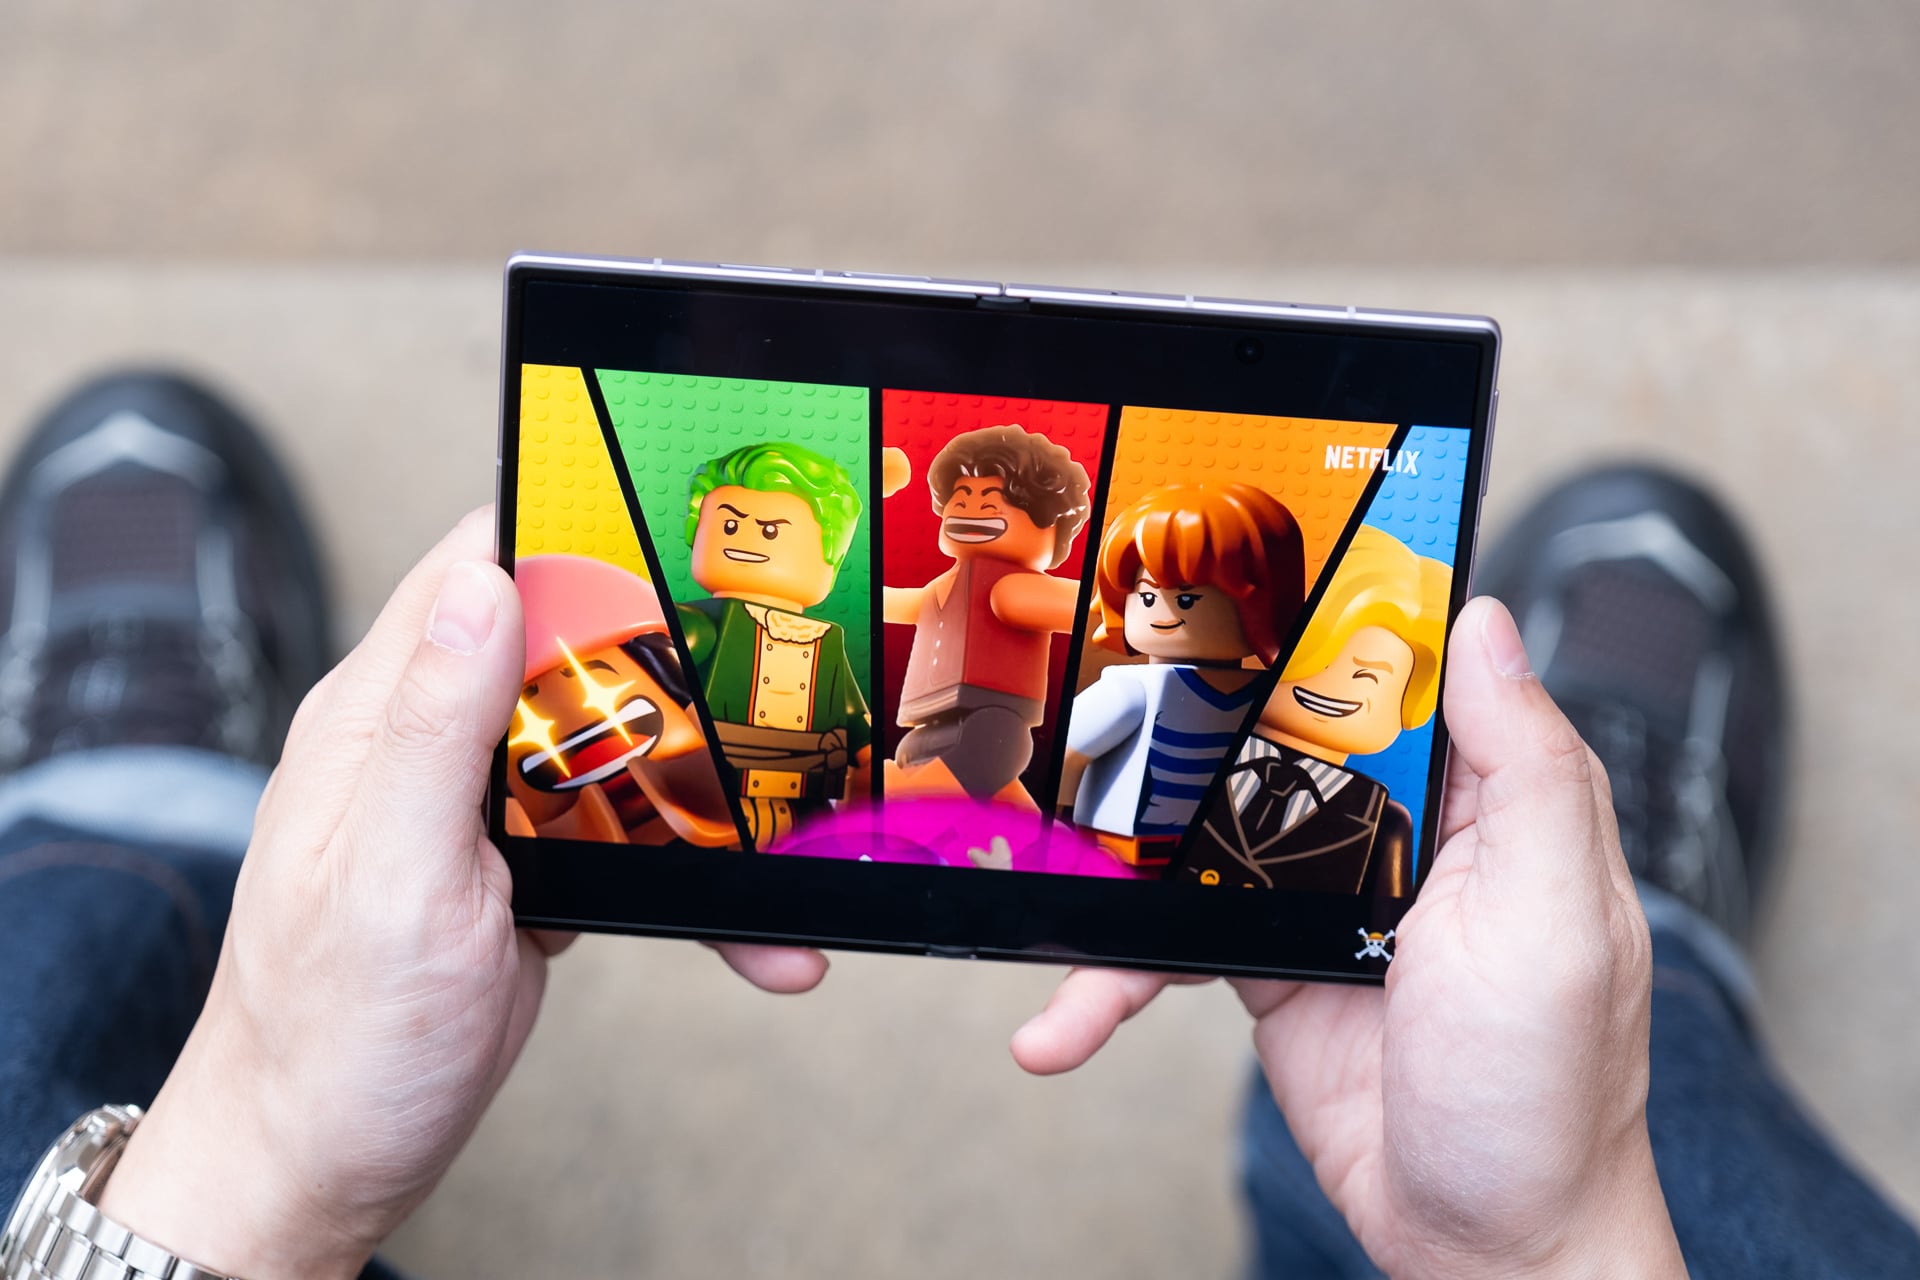
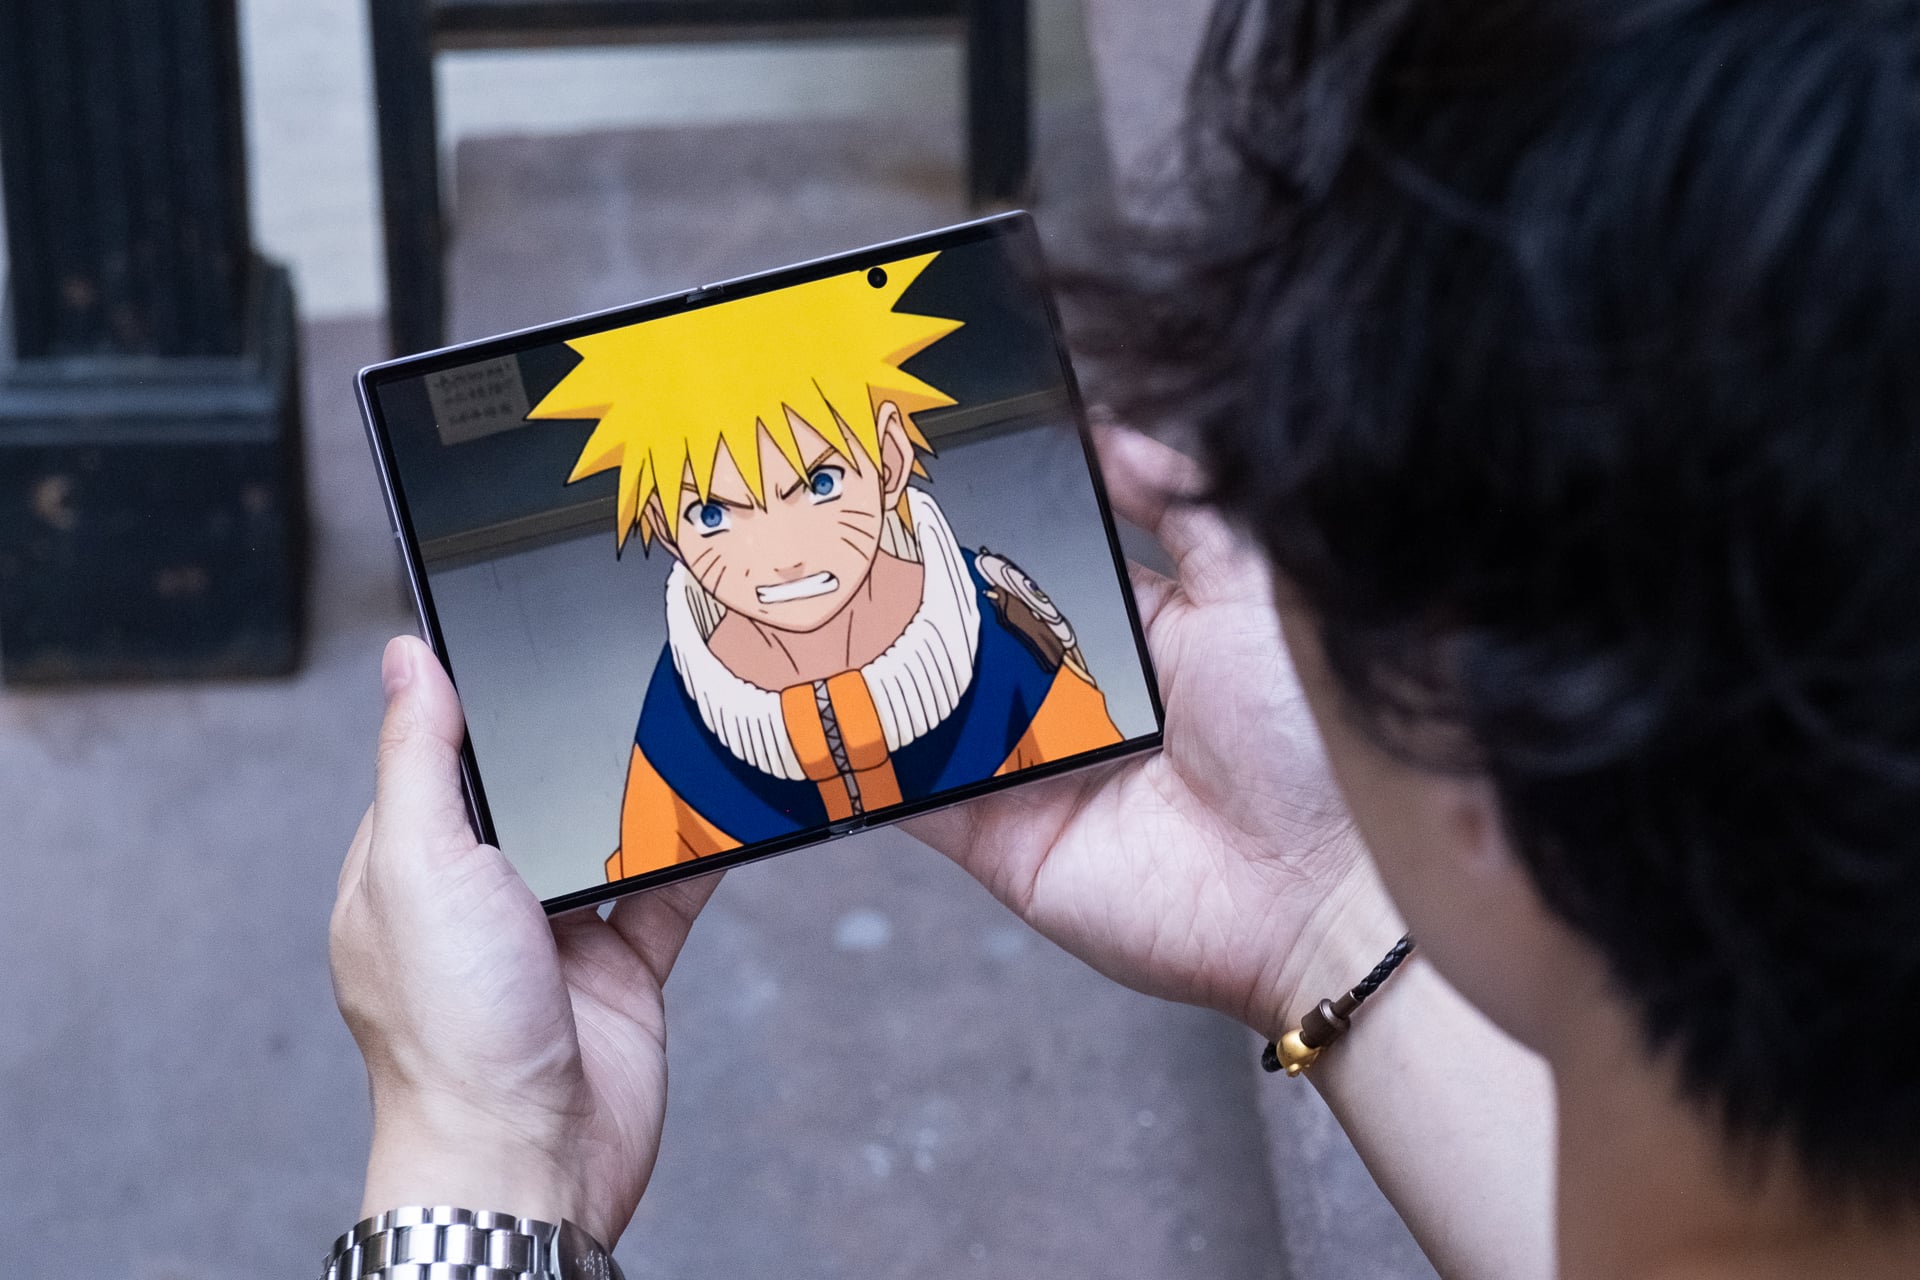
I consume a ridiculous amount of content on a daily basis, so I find the 4:3 aspect ratio more versatile for my needs. In just two weeks, I watched, gamed, and read more on the Z Fold 8 than I have on any new phone I’ve ever tested. Videos look incredible on the 7.6-inch inner screen; 16:9 videos have minimal letterboxing (black bars) above and below them, and old content like many original anime series in 4:3 aspect ratio fill up the entire screen. I’ve never felt more informed and entertained from my phone.
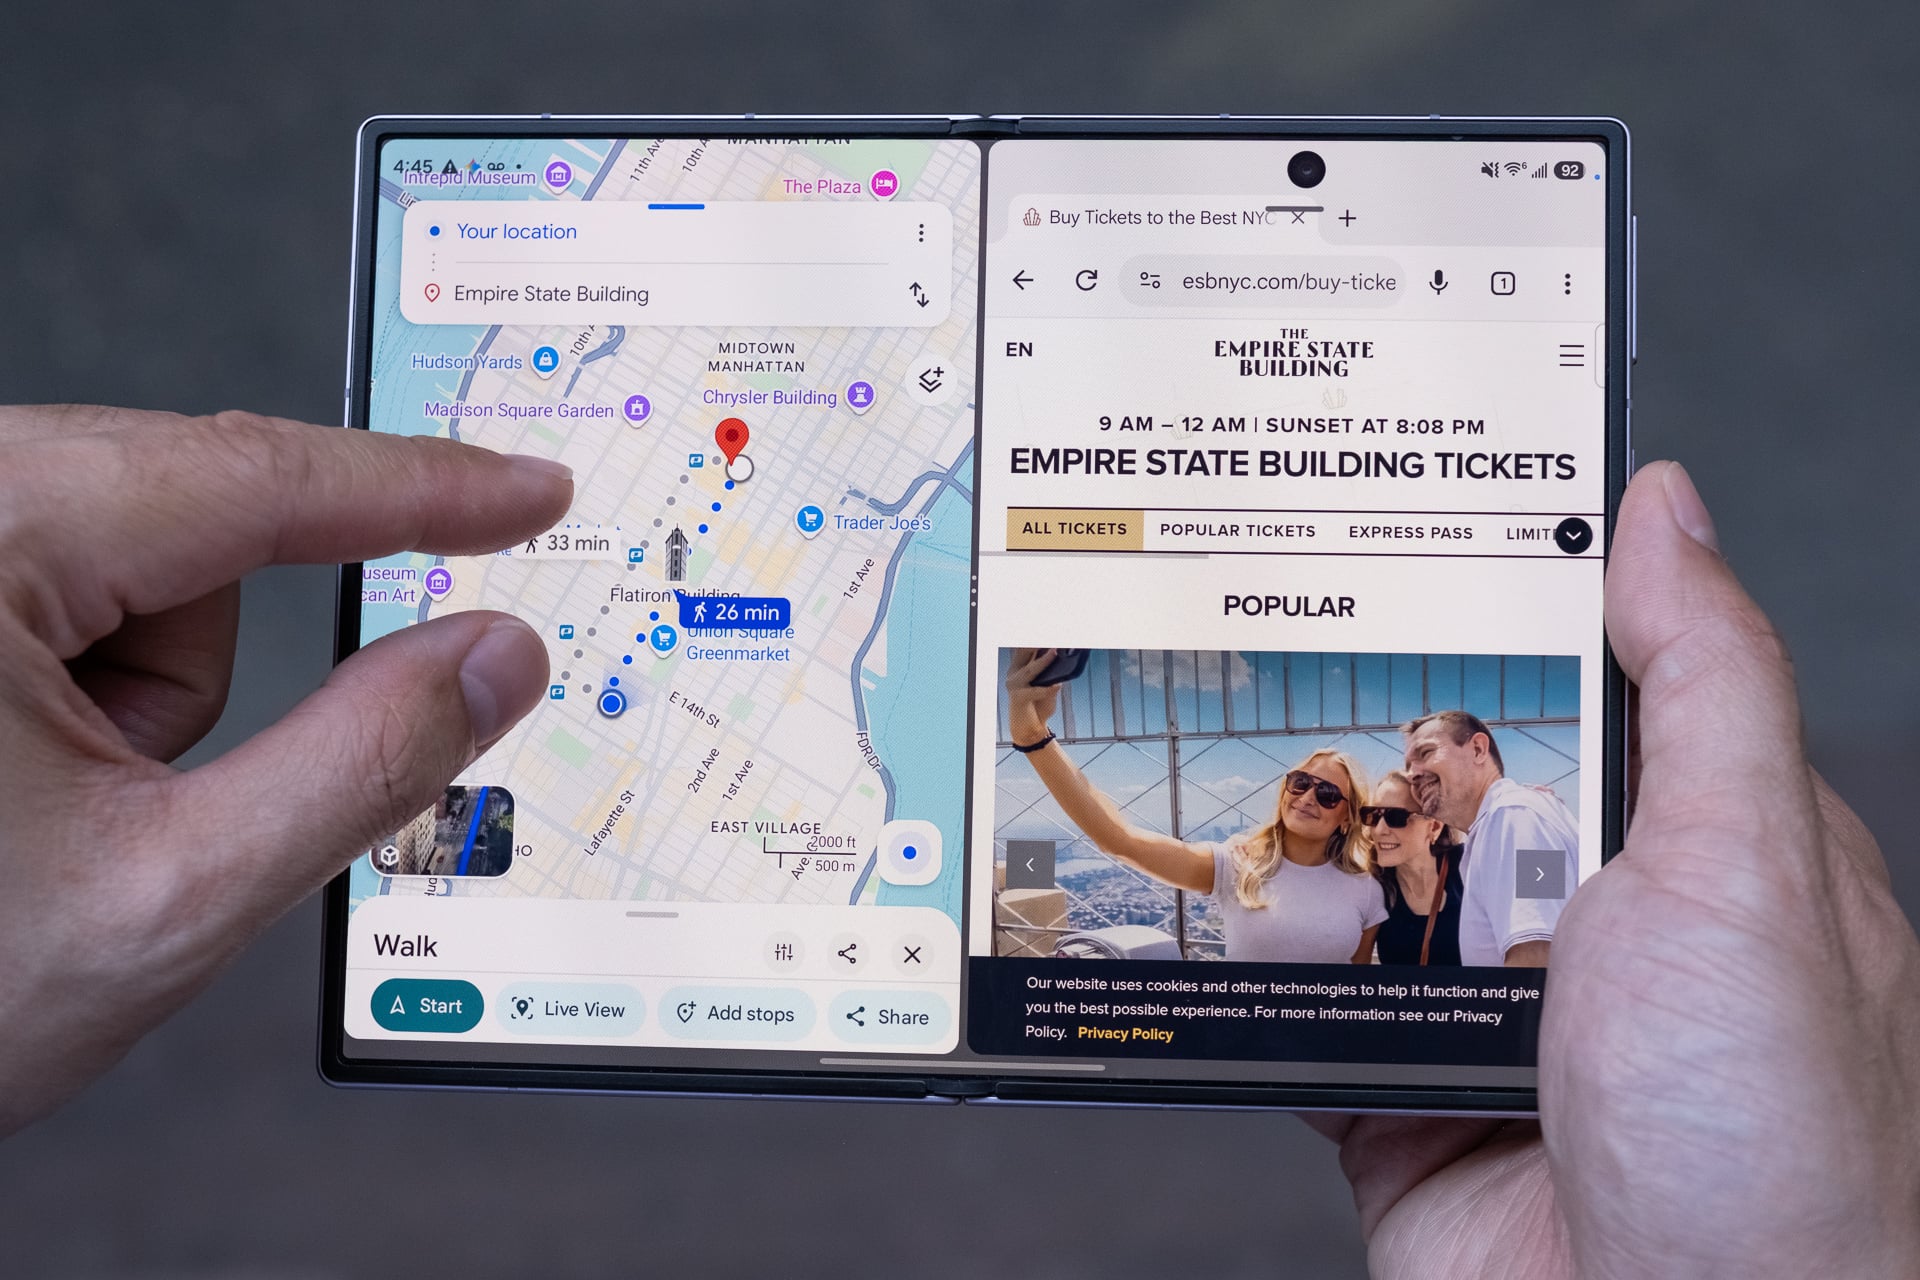
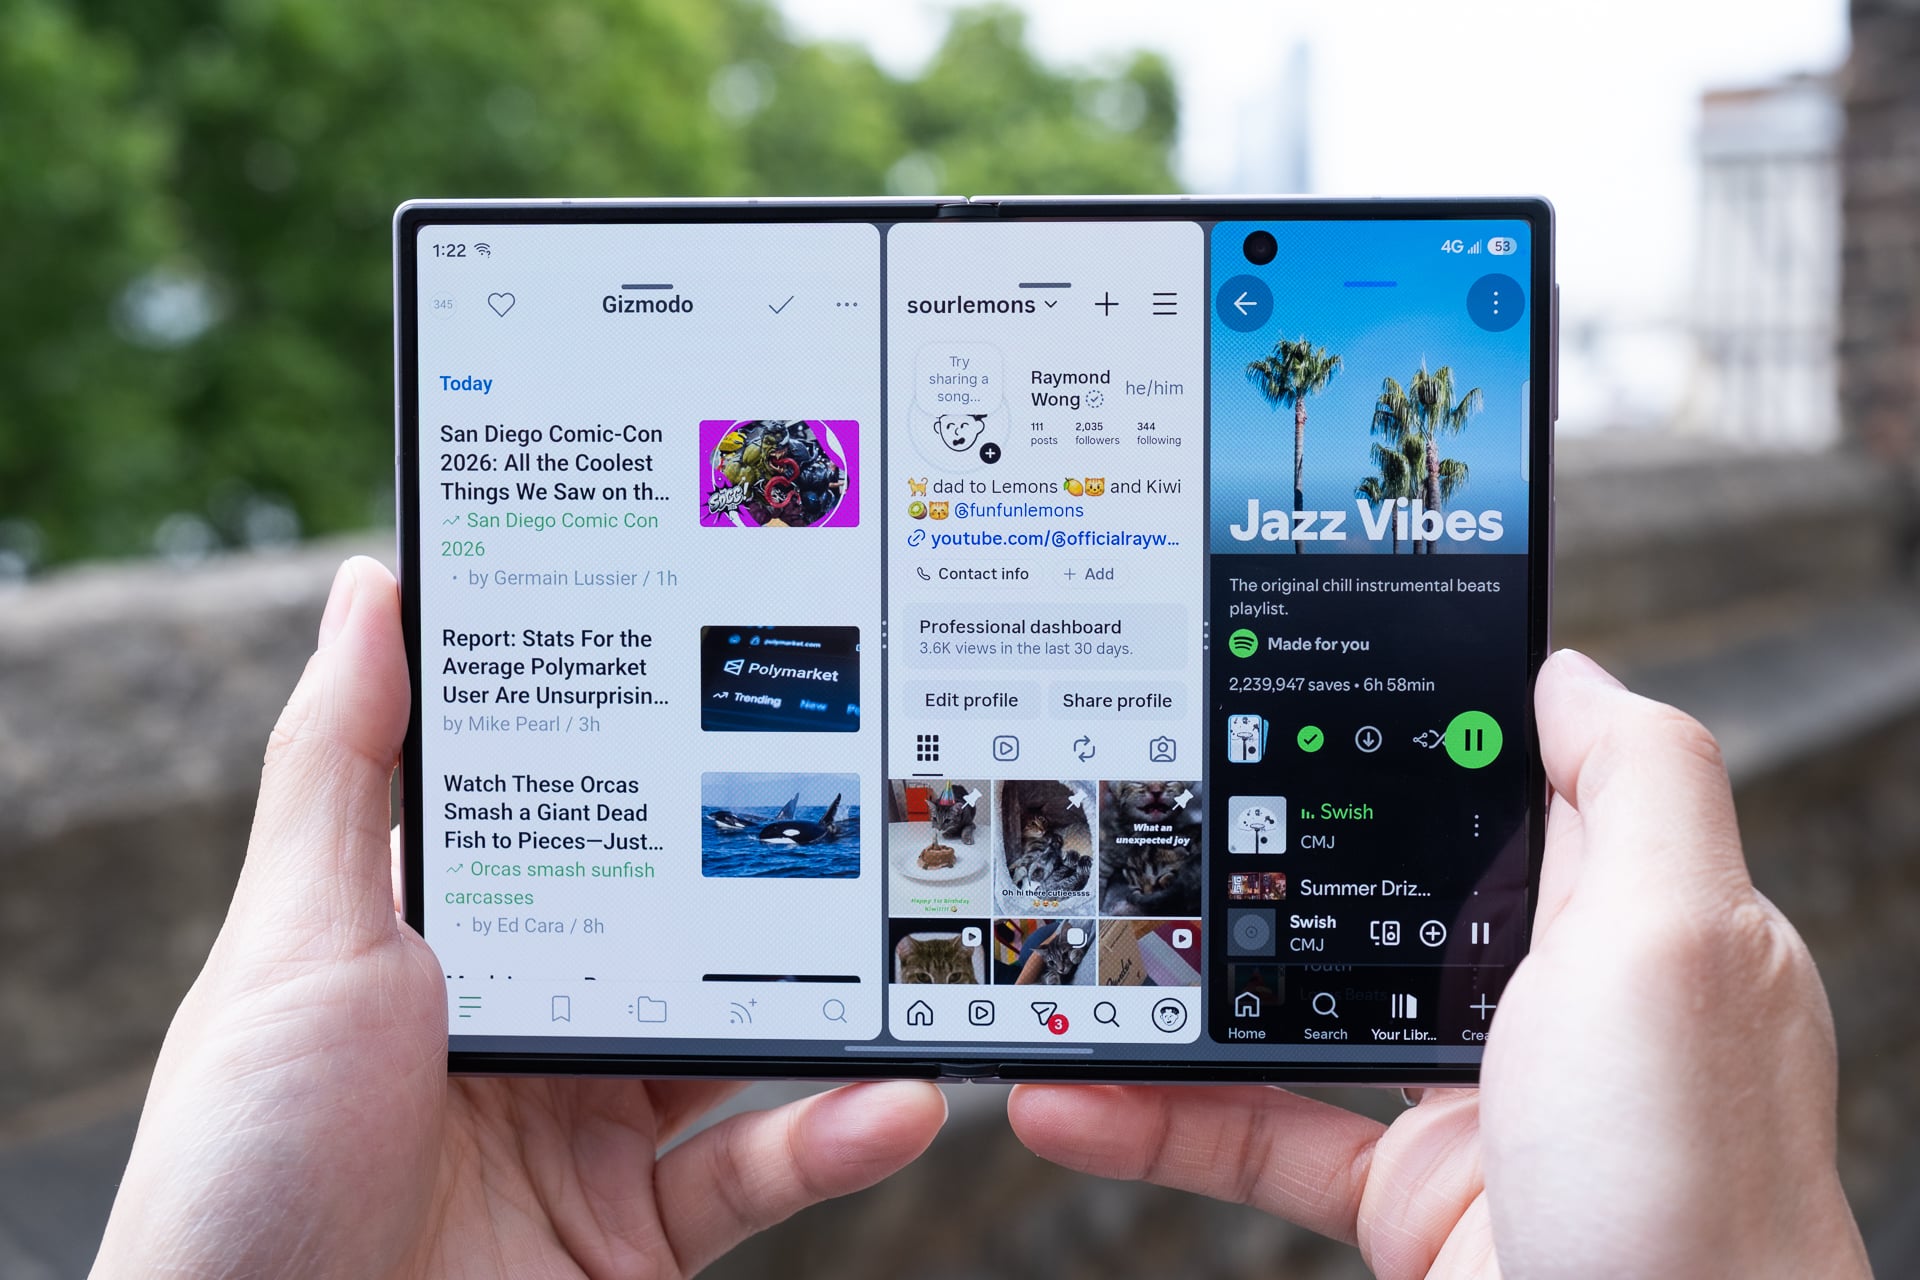
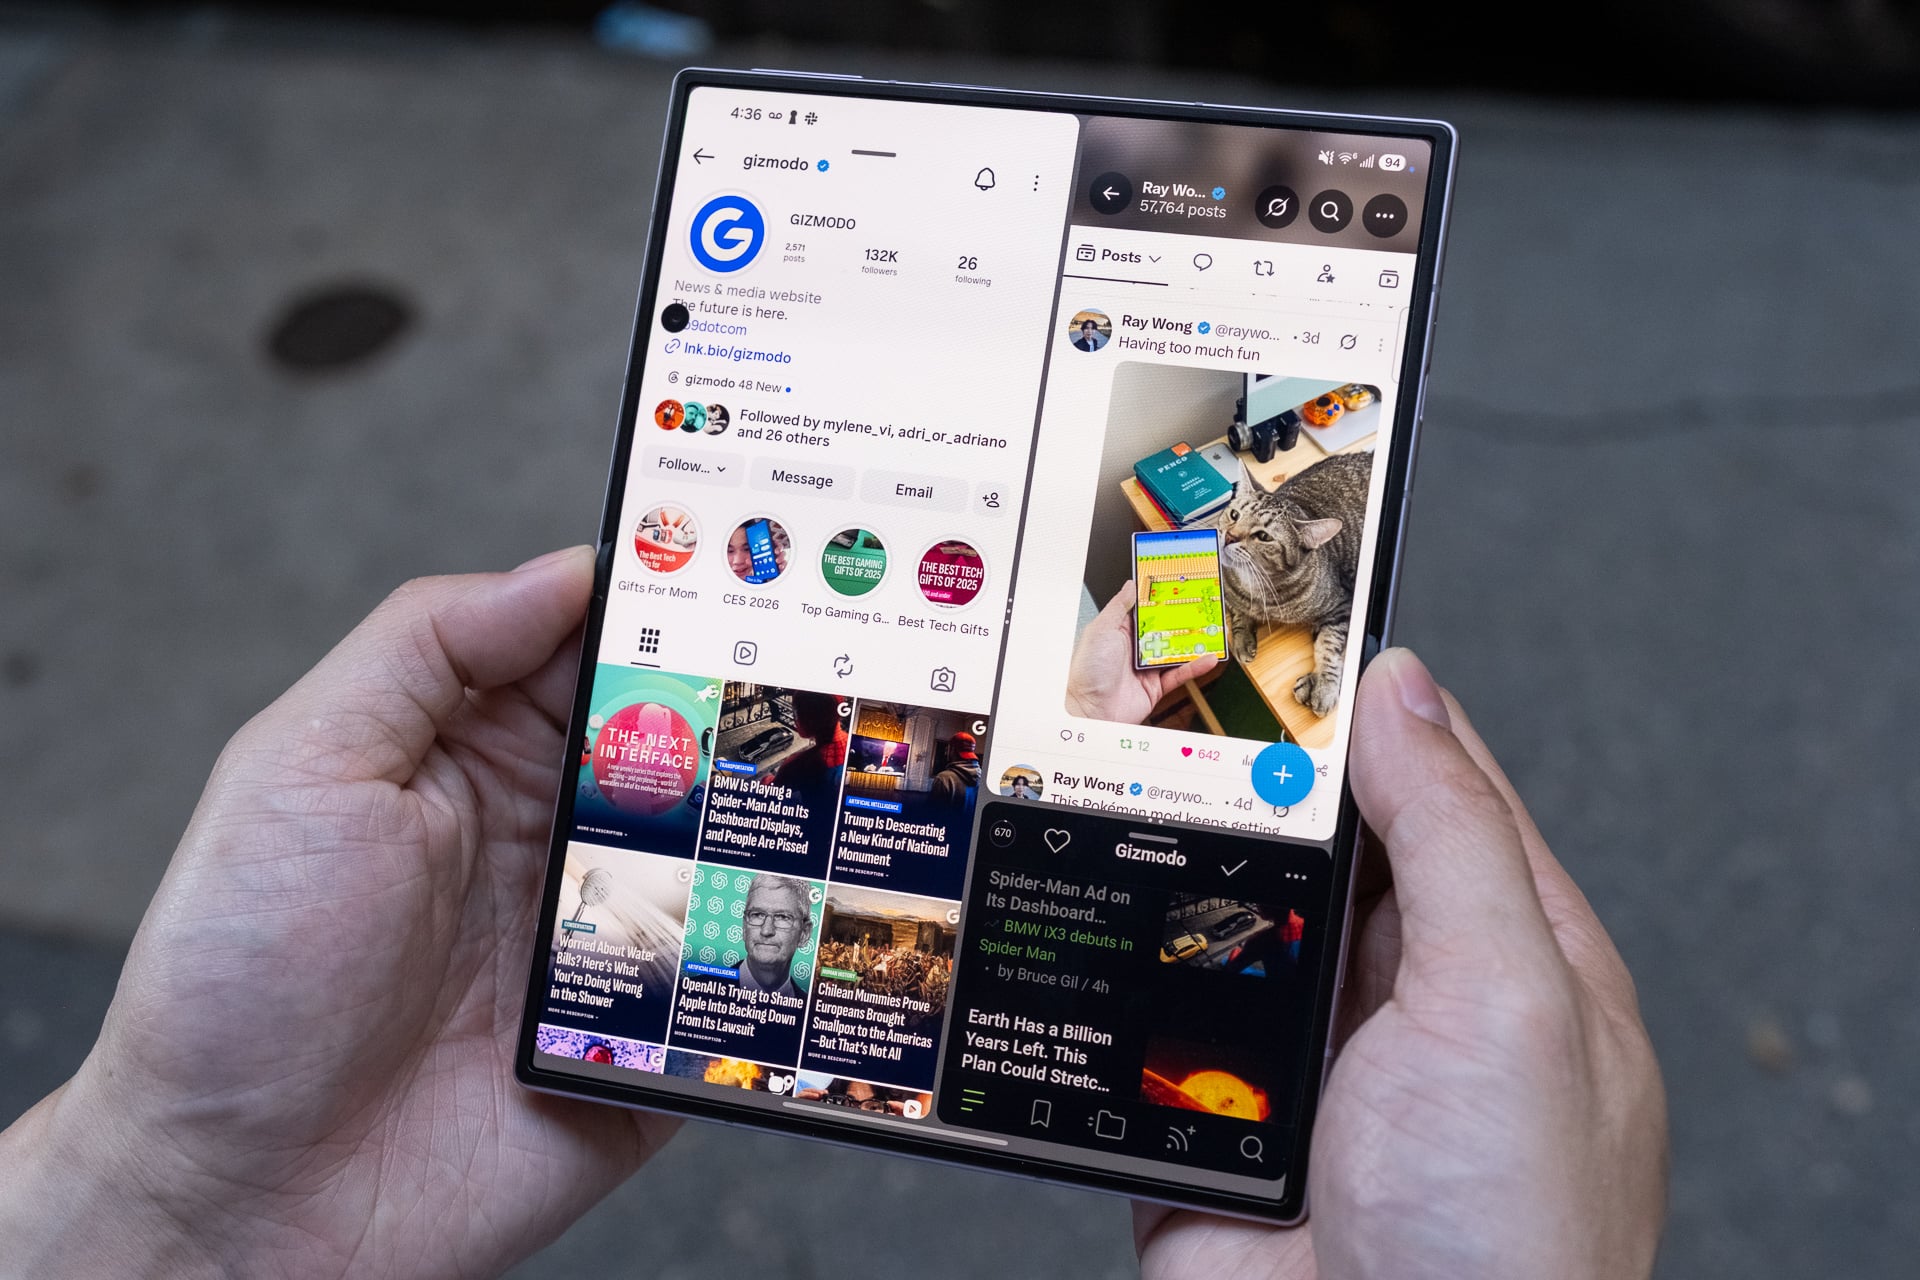
As with the Z Fold 8 Ultra, the Z Fold 8 lets you run three apps in split-screen layouts or four (with a pop-up) on the inner screen. I wouldn’t recommend running more than two apps side by side in landscape orientation. Three apps side by side make each app window very skinny, and one app on one side and two stacked on the other half feel squished. Split-screen apps in vertical orientation just look too long to be useful in most cases. In some split-screen layouts, Samsung’s One UI 9 does let you tap between split-screen apps to have it fill more or most of the screen, but it’s not a function that’s easy to discover.
Performance from the Qualcomm Snapdragon 8 Elite Gen 5 for Galaxy chip is snappy and the 12GB of RAM on my 256GB review unit (you’ll get 16GB if you buy the 1TB model) never chugged when I threw Gemini and Galaxy AI tasks at it. The only thing that occasionally bugs me is that the Z Fold 8 gets toasty even when I’m not doing anything power-hungry. I suspect the super-thin design doesn’t leave much room for adequate thermals; there’s no vapor chamber for cooling like there is on the Galaxy S26 Ultra and iPhone 17 Pro.
The inner screen has been a joy to use, especially on my 1-hour subway commute to and from work. And instead of reaching for my iPad mini in bed, the Z Fold 8 now fills the role instead. It’s great only having to charge one device.
On the topic of charging, the Z Fold 8’s battery is rock solid, lasting me a full day even with heavy use of the inner screen. That’s not surprising since Samsung added a small percentage of silicon carbon into the 4,800mAh battery, which allows for the larger cell while maintaining a slim size. The 45W fast wired charging, with a compatible charger sold separately (of course), was more than quick enough to give me a recharge (around 0% to 65% in 30 minutes) whenever I was low on power. The Z Fold 8 also supports fast wireless charging at 20W, but I used it less compared to other phones like the iPhone 17 Pro or Pixel 10 Pro because Samsung still refuses to include built-in magnetic charging rings. You, again, need to buy a case with magnets to align the phone effortlessly with a Qi2 charger.
The only blemish, literally, on the larger screen experience is the 10-megapixel hole-punch camera on the inner screen. It can obscure essential parts of a menu, buttons, or text depending on what you’re looking at. For example, in Asphalt Legends, I couldn’t see a menu button that the hole punch covered. The hole punch is most noticeable when reading long blocks of text or black and white manga. It makes more sense to put the camera in the corner since it can’t fit in a bezel like on a regular tablet.
Other than that, I might nitpick the placement of the two stereo speakers. They’re located on the top and bottom of the cover screen, which makes them left-side oriented when the Z Fold 8 is unfolded. The speakers get loud enough, but because they’re both on the left in tablet mode, it almost sounds mono coming from one side. To be clear, these are stereo speakers. I get why Samsung might have designed it like this: the speakers fire out of the left and right in tent mode. Maybe put one speaker on each side for a balanced sound when it’s unfolded?
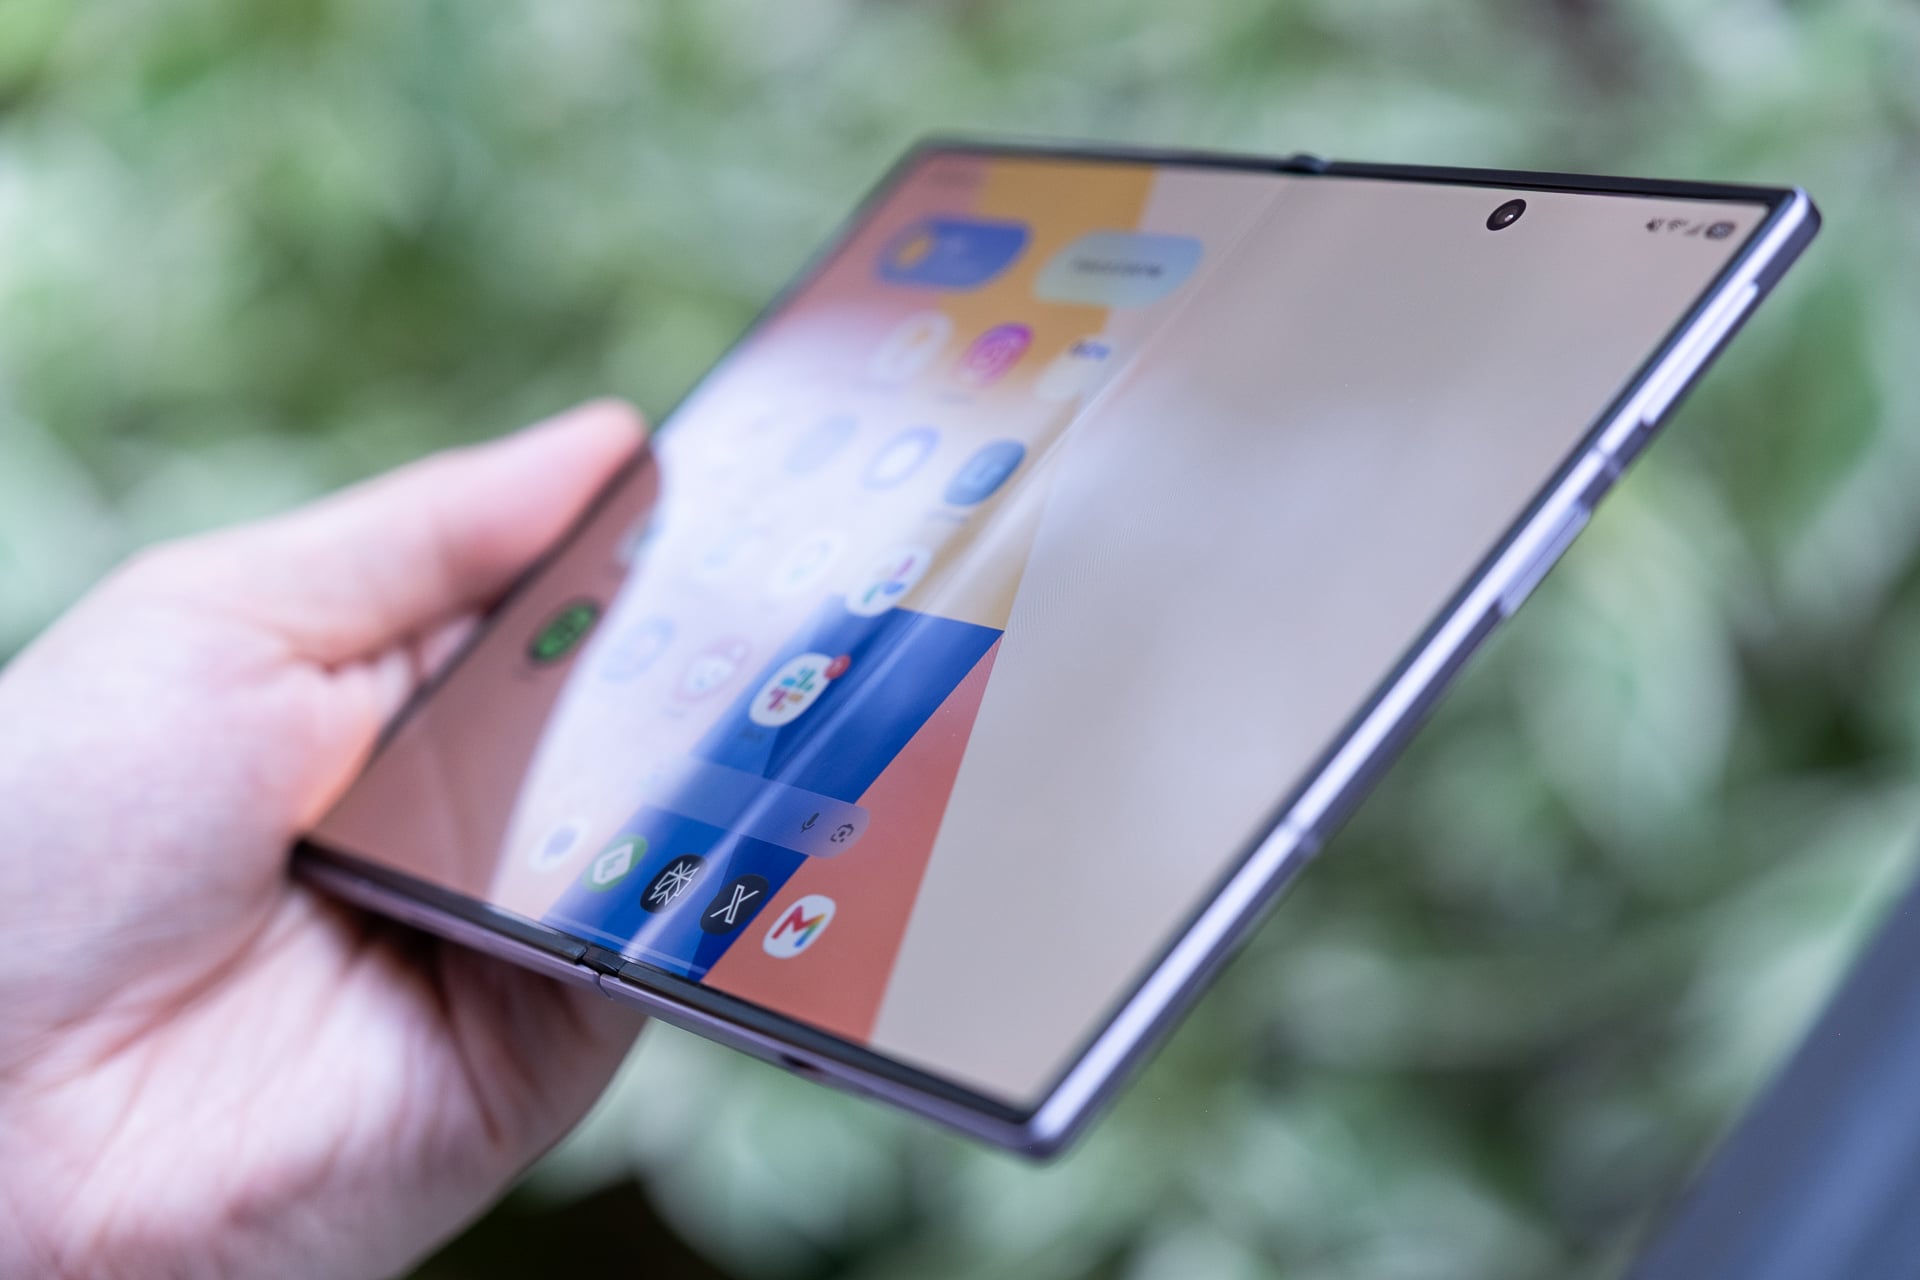
As for the crease… It’s less visible for sure, but hasn’t been completely eliminated. Fresh out of the box, the inner screen is pristine and crease-free. Two weeks in, the crease has deepened with hundreds of folds and I can see it when the screen is off, but it doesn’t warp as much as it did on past Samsung foldables. I almost never notice it when I’m watching videos, gaming, or reading. Besides the reinforced titanium alloy film on top of the screen and the titanium plate underneath it to ensure it stays flatter to the touch over time, Samsung also added an anti-reflective layer to reduce glare, and it really does help. I’ve said it before and I’ll say it again: the crease may never be fully eliminated from folding screens. The best we can hope for may just be making it less visible.
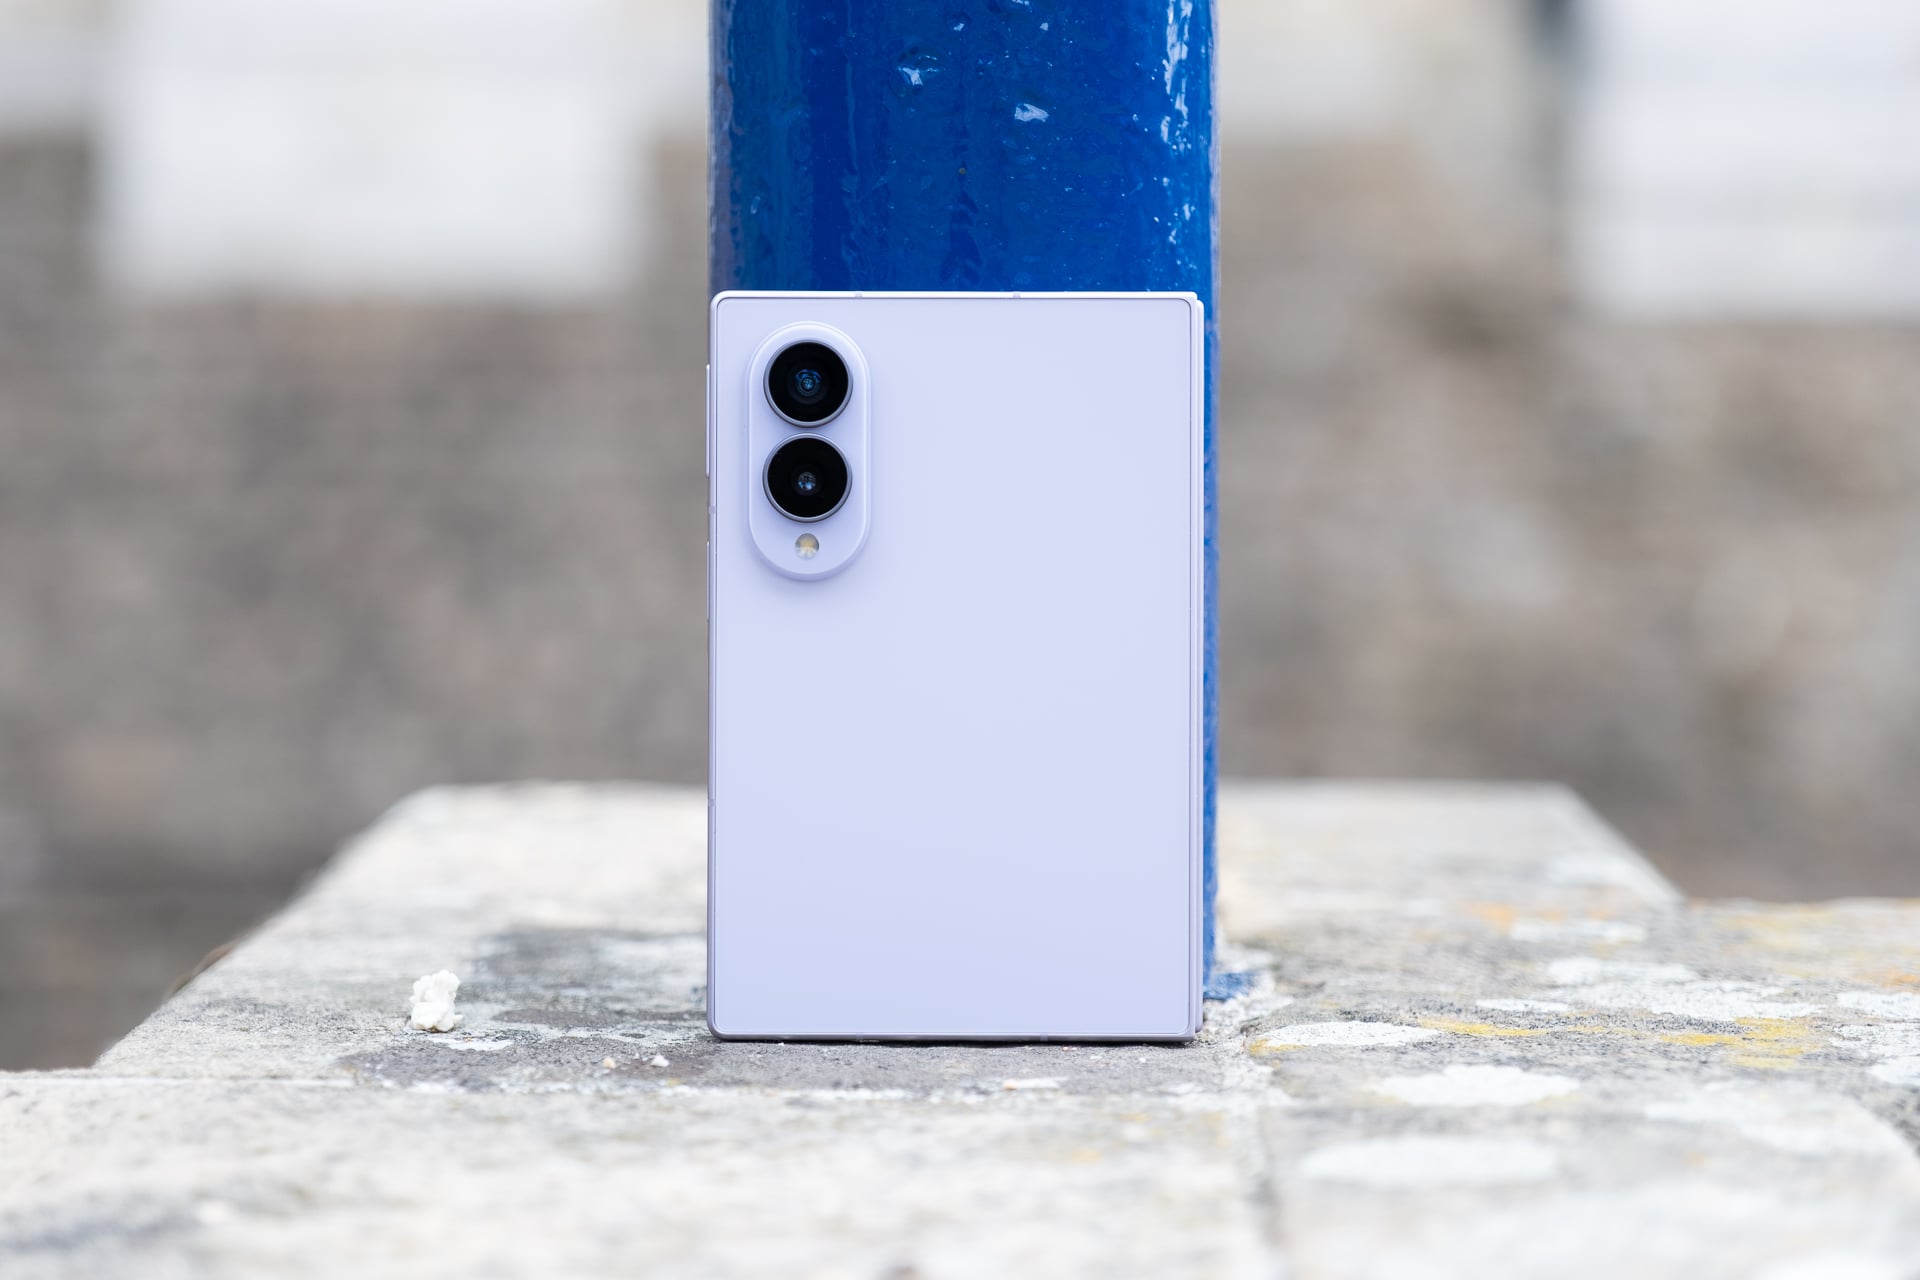
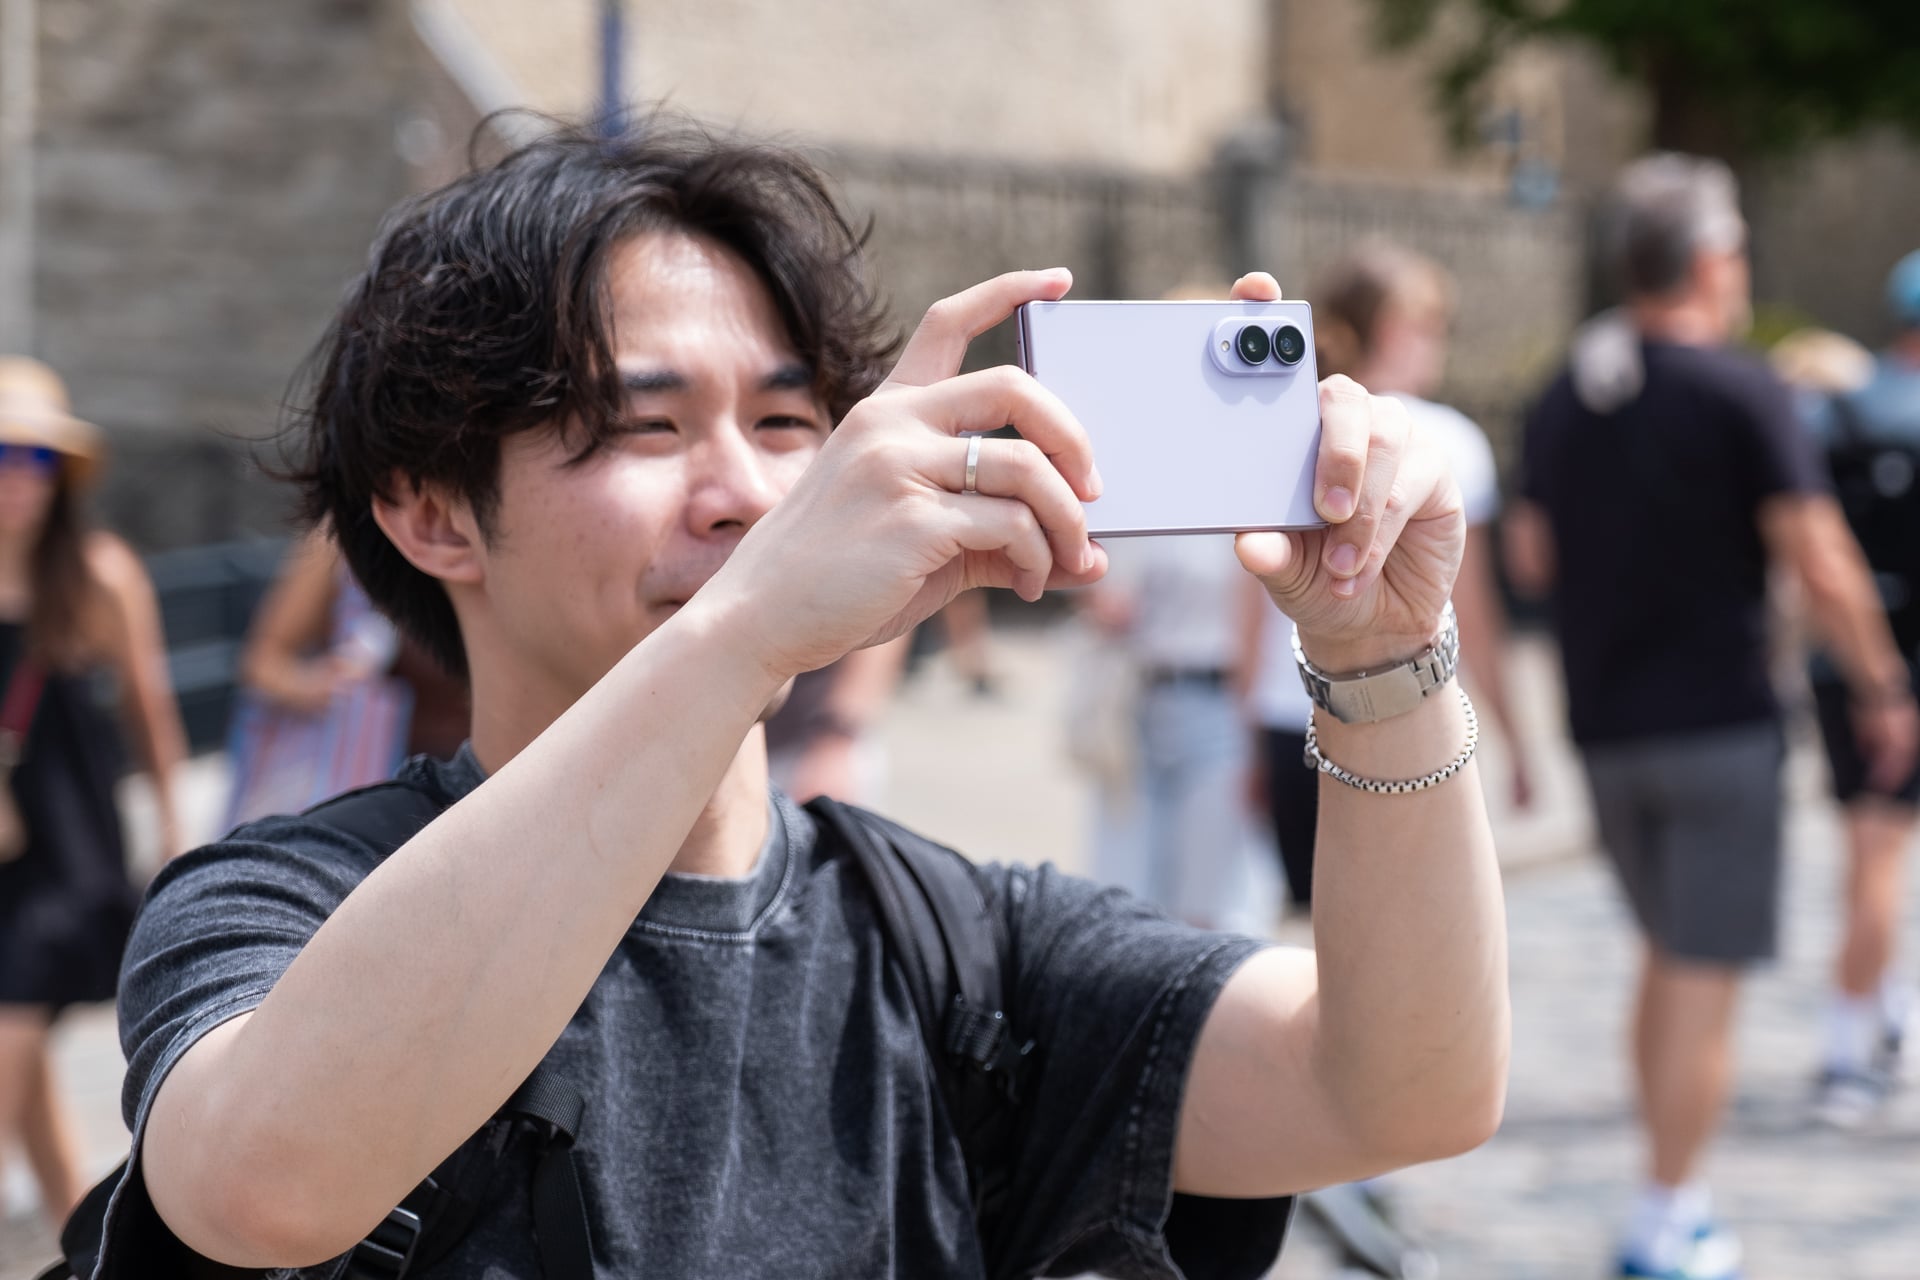
Depending on what you consider the Z Fold 8, either as the sequel to the Z Fold 7 or as a new class of foldables, the cameras will impress or disappoint. If viewed as a Z Fold 7 successor, the 50-megapixel main camera may feel like a downgrade from the previous 200-megapixel shooter. The 50-megapixel ultrawide on the Z Fold 8 will, however, be an upgrade from the Z Fold 7’s 12-megapixel one. You may also be upset it doesn’t have a telephoto lens.
If you want triple rear cameras and more resolution for the main camera, Samsung sells the Z Fold 8 Ultra. I have no complaints with the dual 50-megapixel rear cameras and dual 10-megapixel hole-punch cameras on the Z Fold 8. I don’t think most people will care there’s no telephoto. You still get a 2x zoom that crops in on the 50-megapixel sensor and looks nearly optical-quality to me. This is similar to the virtual 2x “telephoto” that you’ll find on other phones and all recent iPhones that have larger main sensors. The 4x and 10x zooms on the Z Fold 8 are digital, though, and the fuzzier image quality shows.
For everyday photos and videos, the Z Fold 8 cameras are good enough. Image quality looks vibrant and not overly saturated like it used to on Samsung phones and I think the HDR looks less processed compared to iPhone photos. Low-light shots look solid, too. If you’re the type of person who doesn’t want to spend too much or any time editing your photos, the Z Fold 8 photos are more than fine to post directly to social media.
The Z Fold 8 is loaded with a bunch of AI editing features, like “Photo Assist,” which lets you describe an edit with text; “My FanCam,” which lets you motion-track a subject in a video and then crop it for different aspect ratios for posting to social media; and a “Scan” feature that can clean up photos of documents (i.e. sharpen text, flatten and fix the geometry, and remove folded corners or fingers). These can be useful, but there already are apps that exist that do these things. I suppose it’s nice they’re free and built-in.
I also don’t hate any of the new video recording features, like the dual recording mode that lets you record from both the front and rear cameras simultaneously in various layouts (side by side, split top and bottom, and picture in picture) and super steady recording with horizon lock, which keeps the horizon line straight. Again, none are particularly special, but it’s nice that they’re there when you might need them.
It didn’t take long for me to fall in love with the Galaxy Z Fold 8. That’s just not something that happens often anymore. But fall in love with Samsung’s new foldable—I did. The Z Fold 8 is proof that great hardware still matters—and matters more than simply shoving in more AI features.
I like it more than the Z Fold 7 and the Z Fold 8 Ultra, mainly because its 4:3 inner screen makes consuming content a better and more fun experience than swiping on a long bar. One UI 9 is a very polished Android experience, and a feature like Quick Share, which lets you AirDrop files to Apple devices, is a game-changer. Anything that makes an Android phone work with Apple devices is a big plus to me.
There are still some minor things that people will find fault with, like the fact that Samsung has stuck with an IP48 rating for dust and water resistance instead of bumping that up higher to IP68 like Google did with the Pixel 10 Pro Fold or that Samsung didn’t bring back S Pen support. Neither omission makes the Z Fold 8 feel insufficient in my book. I’m not exposing the Z Fold 8 to harsh conditions and I have no attachment to a stylus.
Look, I get it: the Z Fold 8 is still expensive starting at $1,900. I don’t foresee the price of it coming down anytime soon. Samsung’s stuck to around $2,000 for its book-style foldables since the original Galaxy Fold. If you can justify the value of a larger screen experience, the Z Fold 8 is amazing in almost every aspect.
Samsung’s Galaxy Z Fold 8 is the best phone (not just foldable) I’ve ever used for consuming content—watching videos, playing mobile games, reading, and yes, even doomscrolling social media—thanks to its 7.6-inch inner screen.
The book-style foldable phone’s novel shape when closed may look strange at first, but I promise you that its shorter and wider footprint (when closed) quickly feels normal after a few days. The whole point of this form factor is to unfold it for its larger tablet-sized screen, and I can assure you that you’ll be doing that often because the experience encourages it more.
More importantly, the Z Fold 8 has fewer of the compromises that held back Samsung’s previous foldable phones. The device is lighter and easier to unfold, the battery is bigger and lasts all day, and Samsung has greatly reduced the crease on the inner screen.
Some apps still might not display correctly on both screens, but even so, I’m declaring the Z Fold 8 a home run. I can’t stop using it.
Samsung Galaxy Z Fold 8
The Galaxy Z Fold 8 is Samsung’s best version of a book-style foldable phone yet, even with its premium price.
The best size comparisons for the Z Fold 8 are a passport or a B7-sized notebook. The foldable measures 4.88 x 3.24 inches when it’s closed. It’s a few hairs thicker than the Z Fold 8 Ultra, but because of the squatter dimensions and lighter weight, the Z Fold 8 doesn’t feel unwieldy. I’m mostly able to reach corner to corner on the 5.5-inch AMOLED cover screen, something I haven’t been able to do on any “regular” (read: 6 to 6.9-inch) bar-style phone in years.
It also fits in my front pants pockets better than expected; I had concerns that the width might be too wide. I guess if you’re already used to the width of an iPhone 17 Pro Max or a Galaxy S26 Ultra, the Z Fold 8’s only slightly wider.
I’m able to reach the power button/fingerprint reader easily with my right thumb. Lefties might struggle since they can’t use their thumb and will have to register their index finger, which might be a little stretch to press the button, like it is for me. The volume rocker is a little high for me; I prefer its lower position on the Z Fold 7/Z Fold 8 Ultra. Typing with two hands on the cover screen is a much easier affair than on narrower phones; I made fewer typos compared to my iPhone. One-handed typing will depend on whether your hand is large enough and your thumb can stretch across the keyboard.
The 10:16 aspect ratio of the cover screen is also not as cramped as it seems. You lose vertical space compared to most regular phones and taller foldables like the Z Fold 8 Ultra, which means apps will show less and you’ll need to scroll more, but that’s mostly a non-issue if you open the phone and rotate it to vertical orientation. I never found myself bothered that I couldn’t see enough on the cover screen. If anything, I appreciated the shorter screen more because I didn’t feel compelled to pull it out as much unless I wanted to unfold it.
Like on the Z Fold 8 Ultra, you can use the Z Fold 8 in “tent” mode. This is great for propping up the device on a plane tray table or if you’re just too lazy to hold it up while in bed. I fly a lot for work, so tent mode is something I find very useful. A Z Fold 8 Ultra feature that you won’t find on the Z Fold 8 is “Flex mode.” On the Z Fold 8 Ultra, you can snap the screen so that it resembles a baby laptop, and some apps, like YouTube, will display the video above the crease and controls below it. I never found much utility for Flex mode on the previous Z Folds and I don’t miss it on the Z Fold 8. If that’s something you care about, get the Z Fold 8 Ultra instead.
Out of all the book-style foldable phones I’ve tested over the past seven years, the Z Fold 8 is the only one that I have unfolded more times than I have not. With each generation of Z Fold, Samsung made the dimensions more like a regular bar-style phone. I heaped praise on the Z Fold 7 for finally ditching the previous skinny, remote-like shape. And even though I considered the Z Fold 7 my favorite Android phone of 2025, I realized that I only used its inner screen maybe less than 50% of the time I pulled it out. With the cover screen being normal-sized, there just wasn’t as much of a need to unfold it for the 8-inch screen.
That hasn’t been the case with the Z Fold 8. Because of the shorter cover screen, I almost always unfold it to use the larger display. Maybe that’s because the Flex Titanium technology helps the hinge spring open better or the beveled aluminum frame makes it easier to unfold without needing fingernails, or both. Whatever the reasons are, it’s easier to see and feel the benefits of the larger size of the inner screen’s 4:3 aspect ratio for most content than on a more square-ish folding screen like the Z Fold 8 Ultra’s. To get roughly the same diagonal screen for widescreen videos on the Z Fold 8 Ultra, you need to rotate it, which is an extra step. It’s a tiny bit of friction that makes the task of quickly unfolding and getting more screen real estate less convenient. When you’re unfolding the phone dozens of times a day, that one extra step adds up.
After two weeks of using the Z Fold 8 and Z Fold 8 Ultra, I’ve concluded that if you watch more videos and game more than you read, the Z Fold 8 is the better foldable since you won’t need to rotate it so much. If you do more reading and split-screen multitasking, the Z Fold 8 Ultra is more suitable since you’ll get more vertical display on both the cover and inner screens without rotating, and you’ll do less scrolling.
I consume a ridiculous amount of content on a daily basis, so I find the 4:3 aspect ratio more versatile for my needs. In just two weeks, I watched, gamed, and read more on the Z Fold 8 than I have on any new phone I’ve ever tested. Videos look incredible on the 7.6-inch inner screen; 16:9 videos have minimal letterboxing (black bars) above and below them, and old content like many original anime series in 4:3 aspect ratio fill up the entire screen. I’ve never felt more informed and entertained from my phone.
As with the Z Fold 8 Ultra, the Z Fold 8 lets you run three apps in split-screen layouts or four (with a pop-up) on the inner screen. I wouldn’t recommend running more than two apps side by side in landscape orientation. Three apps side by side make each app window very skinny, and one app on one side and two stacked on the other half feel squished. Split-screen apps in vertical orientation just look too long to be useful in most cases. In some split-screen layouts, Samsung’s One UI 9 does let you tap between split-screen apps to have it fill more or most of the screen, but it’s not a function that’s easy to discover.
Performance from the Qualcomm Snapdragon 8 Elite Gen 5 for Galaxy chip is snappy and the 12GB of RAM on my 256GB review unit (you’ll get 16GB if you buy the 1TB model) never chugged when I threw Gemini and Galaxy AI tasks at it. The only thing that occasionally bugs me is that the Z Fold 8 gets toasty even when I’m not doing anything power-hungry. I suspect the super-thin design doesn’t leave much room for adequate thermals; there’s no vapor chamber for cooling like there is on the Galaxy S26 Ultra and iPhone 17 Pro.
The inner screen has been a joy to use, especially on my 1-hour subway commute to and from work. And instead of reaching for my iPad mini in bed, the Z Fold 8 now fills the role instead. It’s great only having to charge one device.
On the topic of charging, the Z Fold 8’s battery is rock solid, lasting me a full day even with heavy use of the inner screen. That’s not surprising since Samsung added a small percentage of silicon carbon into the 4,800mAh battery, which allows for the larger cell while maintaining a slim size. The 45W fast wired charging, with a compatible charger sold separately (of course), was more than quick enough to give me a recharge (around 0% to 65% in 30 minutes) whenever I was low on power. The Z Fold 8 also supports fast wireless charging at 20W, but I used it less compared to other phones like the iPhone 17 Pro or Pixel 10 Pro because Samsung still refuses to include built-in magnetic charging rings. You, again, need to buy a case with magnets to align the phone effortlessly with a Qi2 charger.
The only blemish, literally, on the larger screen experience is the 10-megapixel hole-punch camera on the inner screen. It can obscure essential parts of a menu, buttons, or text depending on what you’re looking at. For example, in Asphalt Legends, I couldn’t see a menu button that the hole punch covered. The hole punch is most noticeable when reading long blocks of text or black and white manga. It makes more sense to put the camera in the corner since it can’t fit in a bezel like on a regular tablet.
Other than that, I might nitpick the placement of the two stereo speakers. They’re located on the top and bottom of the cover screen, which makes them left-side oriented when the Z Fold 8 is unfolded. The speakers get loud enough, but because they’re both on the left in tablet mode, it almost sounds mono coming from one side. To be clear, these are stereo speakers. I get why Samsung might have designed it like this: the speakers fire out of the left and right in tent mode. Maybe put one speaker on each side for a balanced sound when it’s unfolded?
As for the crease… It’s less visible for sure, but hasn’t been completely eliminated. Fresh out of the box, the inner screen is pristine and crease-free. Two weeks in, the crease has deepened with hundreds of folds and I can see it when the screen is off, but it doesn’t warp as much as it did on past Samsung foldables. I almost never notice it when I’m watching videos, gaming, or reading. Besides the reinforced titanium alloy film on top of the screen and the titanium plate underneath it to ensure it stays flatter to the touch over time, Samsung also added an anti-reflective layer to reduce glare, and it really does help. I’ve said it before and I’ll say it again: the crease may never be fully eliminated from folding screens. The best we can hope for may just be making it less visible.
Depending on what you consider the Z Fold 8, either as the sequel to the Z Fold 7 or as a new class of foldables, the cameras will impress or disappoint. If viewed as a Z Fold 7 successor, the 50-megapixel main camera may feel like a downgrade from the previous 200-megapixel shooter. The 50-megapixel ultrawide on the Z Fold 8 will, however, be an upgrade from the Z Fold 7’s 12-megapixel one. You may also be upset it doesn’t have a telephoto lens.
If you want triple rear cameras and more resolution for the main camera, Samsung sells the Z Fold 8 Ultra. I have no complaints with the dual 50-megapixel rear cameras and dual 10-megapixel hole-punch cameras on the Z Fold 8. I don’t think most people will care there’s no telephoto. You still get a 2x zoom that crops in on the 50-megapixel sensor and looks nearly optical-quality to me. This is similar to the virtual 2x “telephoto” that you’ll find on other phones and all recent iPhones that have larger main sensors. The 4x and 10x zooms on the Z Fold 8 are digital, though, and the fuzzier image quality shows.
For everyday photos and videos, the Z Fold 8 cameras are good enough. Image quality looks vibrant and not overly saturated like it used to on Samsung phones and I think the HDR looks less processed compared to iPhone photos. Low-light shots look solid, too. If you’re the type of person who doesn’t want to spend too much or any time editing your photos, the Z Fold 8 photos are more than fine to post directly to social media.
The Z Fold 8 is loaded with a bunch of AI editing features, like “Photo Assist,” which lets you describe an edit with text; “My FanCam,” which lets you motion-track a subject in a video and then crop it for different aspect ratios for posting to social media; and a “Scan” feature that can clean up photos of documents (i.e. sharpen text, flatten and fix the geometry, and remove folded corners or fingers). These can be useful, but there already are apps that exist that do these things. I suppose it’s nice they’re free and built-in.
I also don’t hate any of the new video recording features, like the dual recording mode that lets you record from both the front and rear cameras simultaneously in various layouts (side by side, split top and bottom, and picture in picture) and super steady recording with horizon lock, which keeps the horizon line straight. Again, none are particularly special, but it’s nice that they’re there when you might need them.
It didn’t take long for me to fall in love with the Galaxy Z Fold 8. That’s just not something that happens often anymore. But fall in love with Samsung’s new foldable—I did. The Z Fold 8 is proof that great hardware still matters—and matters more than simply shoving in more AI features.
I like it more than the Z Fold 7 and the Z Fold 8 Ultra, mainly because its 4:3 inner screen makes consuming content a better and more fun experience than swiping on a long bar. One UI 9 is a very polished Android experience, and a feature like Quick Share, which lets you AirDrop files to Apple devices, is a game-changer. Anything that makes an Android phone work with Apple devices is a big plus to me.
There are still some minor things that people will find fault with, like the fact that Samsung has stuck with an IP48 rating for dust and water resistance instead of bumping that up higher to IP68 like Google did with the Pixel 10 Pro Fold or that Samsung didn’t bring back S Pen support. Neither omission makes the Z Fold 8 feel insufficient in my book. I’m not exposing the Z Fold 8 to harsh conditions and I have no attachment to a stylus.
Look, I get it: the Z Fold 8 is still expensive starting at $1,900. I don’t foresee the price of it coming down anytime soon. Samsung’s stuck to around $2,000 for its book-style foldables since the original Galaxy Fold. If you can justify the value of a larger screen experience, the Z Fold 8 is amazing in almost every aspect.
#Samsung #Galaxy #Fold #Review #Fun #Phone #AgesAndroid,foldables,mobile,Reviews,Samsung,Smartphones">Samsung Galaxy Z Fold 8 Review: The Most Fun Phone in Ages
Samsung’s Galaxy Z Fold 8 is the best phone (not just foldable) I’ve ever used for consuming content—watching videos, playing mobile games, reading, and yes, even doomscrolling social media—thanks to its 7.6-inch inner screen.
The book-style foldable phone’s novel shape when closed may look strange at first, but I promise you that its shorter and wider footprint (when closed) quickly feels normal after a few days. The whole point of this form factor is to unfold it for its larger tablet-sized screen, and I can assure you that you’ll be doing that often because the experience encourages it more.
More importantly, the Z Fold 8 has fewer of the compromises that held back Samsung’s previous foldable phones. The device is lighter and easier to unfold, the battery is bigger and lasts all day, and Samsung has greatly reduced the crease on the inner screen.
Some apps still might not display correctly on both screens, but even so, I’m declaring the Z Fold 8 a home run. I can’t stop using it.
Samsung Galaxy Z Fold 8
The Galaxy Z Fold 8 is Samsung’s best version of a book-style foldable phone yet, even with its premium price.
The best size comparisons for the Z Fold 8 are a passport or a B7-sized notebook. The foldable measures 4.88 x 3.24 inches when it’s closed. It’s a few hairs thicker than the Z Fold 8 Ultra, but because of the squatter dimensions and lighter weight, the Z Fold 8 doesn’t feel unwieldy. I’m mostly able to reach corner to corner on the 5.5-inch AMOLED cover screen, something I haven’t been able to do on any “regular” (read: 6 to 6.9-inch) bar-style phone in years.
It also fits in my front pants pockets better than expected; I had concerns that the width might be too wide. I guess if you’re already used to the width of an iPhone 17 Pro Max or a Galaxy S26 Ultra, the Z Fold 8’s only slightly wider.
I’m able to reach the power button/fingerprint reader easily with my right thumb. Lefties might struggle since they can’t use their thumb and will have to register their index finger, which might be a little stretch to press the button, like it is for me. The volume rocker is a little high for me; I prefer its lower position on the Z Fold 7/Z Fold 8 Ultra. Typing with two hands on the cover screen is a much easier affair than on narrower phones; I made fewer typos compared to my iPhone. One-handed typing will depend on whether your hand is large enough and your thumb can stretch across the keyboard.
The 10:16 aspect ratio of the cover screen is also not as cramped as it seems. You lose vertical space compared to most regular phones and taller foldables like the Z Fold 8 Ultra, which means apps will show less and you’ll need to scroll more, but that’s mostly a non-issue if you open the phone and rotate it to vertical orientation. I never found myself bothered that I couldn’t see enough on the cover screen. If anything, I appreciated the shorter screen more because I didn’t feel compelled to pull it out as much unless I wanted to unfold it.
Like on the Z Fold 8 Ultra, you can use the Z Fold 8 in “tent” mode. This is great for propping up the device on a plane tray table or if you’re just too lazy to hold it up while in bed. I fly a lot for work, so tent mode is something I find very useful. A Z Fold 8 Ultra feature that you won’t find on the Z Fold 8 is “Flex mode.” On the Z Fold 8 Ultra, you can snap the screen so that it resembles a baby laptop, and some apps, like YouTube, will display the video above the crease and controls below it. I never found much utility for Flex mode on the previous Z Folds and I don’t miss it on the Z Fold 8. If that’s something you care about, get the Z Fold 8 Ultra instead.
Out of all the book-style foldable phones I’ve tested over the past seven years, the Z Fold 8 is the only one that I have unfolded more times than I have not. With each generation of Z Fold, Samsung made the dimensions more like a regular bar-style phone. I heaped praise on the Z Fold 7 for finally ditching the previous skinny, remote-like shape. And even though I considered the Z Fold 7 my favorite Android phone of 2025, I realized that I only used its inner screen maybe less than 50% of the time I pulled it out. With the cover screen being normal-sized, there just wasn’t as much of a need to unfold it for the 8-inch screen.
That hasn’t been the case with the Z Fold 8. Because of the shorter cover screen, I almost always unfold it to use the larger display. Maybe that’s because the Flex Titanium technology helps the hinge spring open better or the beveled aluminum frame makes it easier to unfold without needing fingernails, or both. Whatever the reasons are, it’s easier to see and feel the benefits of the larger size of the inner screen’s 4:3 aspect ratio for most content than on a more square-ish folding screen like the Z Fold 8 Ultra’s. To get roughly the same diagonal screen for widescreen videos on the Z Fold 8 Ultra, you need to rotate it, which is an extra step. It’s a tiny bit of friction that makes the task of quickly unfolding and getting more screen real estate less convenient. When you’re unfolding the phone dozens of times a day, that one extra step adds up.
After two weeks of using the Z Fold 8 and Z Fold 8 Ultra, I’ve concluded that if you watch more videos and game more than you read, the Z Fold 8 is the better foldable since you won’t need to rotate it so much. If you do more reading and split-screen multitasking, the Z Fold 8 Ultra is more suitable since you’ll get more vertical display on both the cover and inner screens without rotating, and you’ll do less scrolling.
I consume a ridiculous amount of content on a daily basis, so I find the 4:3 aspect ratio more versatile for my needs. In just two weeks, I watched, gamed, and read more on the Z Fold 8 than I have on any new phone I’ve ever tested. Videos look incredible on the 7.6-inch inner screen; 16:9 videos have minimal letterboxing (black bars) above and below them, and old content like many original anime series in 4:3 aspect ratio fill up the entire screen. I’ve never felt more informed and entertained from my phone.
As with the Z Fold 8 Ultra, the Z Fold 8 lets you run three apps in split-screen layouts or four (with a pop-up) on the inner screen. I wouldn’t recommend running more than two apps side by side in landscape orientation. Three apps side by side make each app window very skinny, and one app on one side and two stacked on the other half feel squished. Split-screen apps in vertical orientation just look too long to be useful in most cases. In some split-screen layouts, Samsung’s One UI 9 does let you tap between split-screen apps to have it fill more or most of the screen, but it’s not a function that’s easy to discover.
Performance from the Qualcomm Snapdragon 8 Elite Gen 5 for Galaxy chip is snappy and the 12GB of RAM on my 256GB review unit (you’ll get 16GB if you buy the 1TB model) never chugged when I threw Gemini and Galaxy AI tasks at it. The only thing that occasionally bugs me is that the Z Fold 8 gets toasty even when I’m not doing anything power-hungry. I suspect the super-thin design doesn’t leave much room for adequate thermals; there’s no vapor chamber for cooling like there is on the Galaxy S26 Ultra and iPhone 17 Pro.
The inner screen has been a joy to use, especially on my 1-hour subway commute to and from work. And instead of reaching for my iPad mini in bed, the Z Fold 8 now fills the role instead. It’s great only having to charge one device.
On the topic of charging, the Z Fold 8’s battery is rock solid, lasting me a full day even with heavy use of the inner screen. That’s not surprising since Samsung added a small percentage of silicon carbon into the 4,800mAh battery, which allows for the larger cell while maintaining a slim size. The 45W fast wired charging, with a compatible charger sold separately (of course), was more than quick enough to give me a recharge (around 0% to 65% in 30 minutes) whenever I was low on power. The Z Fold 8 also supports fast wireless charging at 20W, but I used it less compared to other phones like the iPhone 17 Pro or Pixel 10 Pro because Samsung still refuses to include built-in magnetic charging rings. You, again, need to buy a case with magnets to align the phone effortlessly with a Qi2 charger.
The only blemish, literally, on the larger screen experience is the 10-megapixel hole-punch camera on the inner screen. It can obscure essential parts of a menu, buttons, or text depending on what you’re looking at. For example, in Asphalt Legends, I couldn’t see a menu button that the hole punch covered. The hole punch is most noticeable when reading long blocks of text or black and white manga. It makes more sense to put the camera in the corner since it can’t fit in a bezel like on a regular tablet.
Other than that, I might nitpick the placement of the two stereo speakers. They’re located on the top and bottom of the cover screen, which makes them left-side oriented when the Z Fold 8 is unfolded. The speakers get loud enough, but because they’re both on the left in tablet mode, it almost sounds mono coming from one side. To be clear, these are stereo speakers. I get why Samsung might have designed it like this: the speakers fire out of the left and right in tent mode. Maybe put one speaker on each side for a balanced sound when it’s unfolded?
As for the crease… It’s less visible for sure, but hasn’t been completely eliminated. Fresh out of the box, the inner screen is pristine and crease-free. Two weeks in, the crease has deepened with hundreds of folds and I can see it when the screen is off, but it doesn’t warp as much as it did on past Samsung foldables. I almost never notice it when I’m watching videos, gaming, or reading. Besides the reinforced titanium alloy film on top of the screen and the titanium plate underneath it to ensure it stays flatter to the touch over time, Samsung also added an anti-reflective layer to reduce glare, and it really does help. I’ve said it before and I’ll say it again: the crease may never be fully eliminated from folding screens. The best we can hope for may just be making it less visible.
Depending on what you consider the Z Fold 8, either as the sequel to the Z Fold 7 or as a new class of foldables, the cameras will impress or disappoint. If viewed as a Z Fold 7 successor, the 50-megapixel main camera may feel like a downgrade from the previous 200-megapixel shooter. The 50-megapixel ultrawide on the Z Fold 8 will, however, be an upgrade from the Z Fold 7’s 12-megapixel one. You may also be upset it doesn’t have a telephoto lens.
If you want triple rear cameras and more resolution for the main camera, Samsung sells the Z Fold 8 Ultra. I have no complaints with the dual 50-megapixel rear cameras and dual 10-megapixel hole-punch cameras on the Z Fold 8. I don’t think most people will care there’s no telephoto. You still get a 2x zoom that crops in on the 50-megapixel sensor and looks nearly optical-quality to me. This is similar to the virtual 2x “telephoto” that you’ll find on other phones and all recent iPhones that have larger main sensors. The 4x and 10x zooms on the Z Fold 8 are digital, though, and the fuzzier image quality shows.
For everyday photos and videos, the Z Fold 8 cameras are good enough. Image quality looks vibrant and not overly saturated like it used to on Samsung phones and I think the HDR looks less processed compared to iPhone photos. Low-light shots look solid, too. If you’re the type of person who doesn’t want to spend too much or any time editing your photos, the Z Fold 8 photos are more than fine to post directly to social media.
The Z Fold 8 is loaded with a bunch of AI editing features, like “Photo Assist,” which lets you describe an edit with text; “My FanCam,” which lets you motion-track a subject in a video and then crop it for different aspect ratios for posting to social media; and a “Scan” feature that can clean up photos of documents (i.e. sharpen text, flatten and fix the geometry, and remove folded corners or fingers). These can be useful, but there already are apps that exist that do these things. I suppose it’s nice they’re free and built-in.
I also don’t hate any of the new video recording features, like the dual recording mode that lets you record from both the front and rear cameras simultaneously in various layouts (side by side, split top and bottom, and picture in picture) and super steady recording with horizon lock, which keeps the horizon line straight. Again, none are particularly special, but it’s nice that they’re there when you might need them.
It didn’t take long for me to fall in love with the Galaxy Z Fold 8. That’s just not something that happens often anymore. But fall in love with Samsung’s new foldable—I did. The Z Fold 8 is proof that great hardware still matters—and matters more than simply shoving in more AI features.
I like it more than the Z Fold 7 and the Z Fold 8 Ultra, mainly because its 4:3 inner screen makes consuming content a better and more fun experience than swiping on a long bar. One UI 9 is a very polished Android experience, and a feature like Quick Share, which lets you AirDrop files to Apple devices, is a game-changer. Anything that makes an Android phone work with Apple devices is a big plus to me.
There are still some minor things that people will find fault with, like the fact that Samsung has stuck with an IP48 rating for dust and water resistance instead of bumping that up higher to IP68 like Google did with the Pixel 10 Pro Fold or that Samsung didn’t bring back S Pen support. Neither omission makes the Z Fold 8 feel insufficient in my book. I’m not exposing the Z Fold 8 to harsh conditions and I have no attachment to a stylus.
Look, I get it: the Z Fold 8 is still expensive starting at $1,900. I don’t foresee the price of it coming down anytime soon. Samsung’s stuck to around $2,000 for its book-style foldables since the original Galaxy Fold. If you can justify the value of a larger screen experience, the Z Fold 8 is amazing in almost every aspect.
At the start of the summer, I impulse-purchased a pair of JisuLife Life10 S fans from Costco, which at CDN $25 each (or $32.99 through Amazon), are among the most basic offerings from the company. JisuLife’s extensive lineup includes some fan models costing close to $100 with features like reverse-charging to power your phone and 100 different speed settings. I want all those features, but my goal was to not spend several hundred dollars on personal cooling devices that could easily go missing or get damaged during the chaos of summer activities.
On the back of the fan is a USB-C charging port and a sliding power switch that prevents the fan from accidentally turning on while it’s being jostled around inside a bag.
The Life10 S’ functionality is comparatively basic, but also easy to use. A sliding power switch on the back prevents it from accidentally turning on while banging around inside a backpack, and a single button on the front cycles through five different fan speeds. There’s also a basic LCD display showing the battery’s remaining charge when the fan is first powered on and the current speed setting. It’s simple, but the Life10 S does its one job quietly and for a surprisingly long time.
A single button cycles through the fan’s five different speed settings.
When Dyson announced its first handheld fan in April, I assumed the company that had developed an expertise in moving air had created a personal cooling device that would outperform everything else on the market. My spouse loves their Dyson hair dryer, and I was sure the HushJet Mini Cool would be my secret weapon for surviving hot and humid summers, even if at $99 it was a splurge. But having used both Dyson’s personal fan and JisuLife’s $25 alternative, I only reach for the latter when braving the world without AC.
The basic LCD display on the front of the fan is sometimes hard to see because it’s hidden behind a reflective black cover, but the fan is easy to use without being able to see it.
Dyson’s HushJet Mini Cool wraps impressive engineering in an eye-catching design, and at its highest setting, it easily out blasts JisuLife’s even with the Life10 S set to full power. But even at its lowest setting, the HushJet is loud with a high-pitched whine reminiscent of Dyson’s vacuums. I don’t mind that sound when it’s limited to short bursts of cleaning at ground level, but not when coming from a tiny fan designed to be used close to your face and ears. The JisuLife fan produces sound at a much lower frequency, making it easier to tolerate for hours, even if it’s far from whisper quiet at full power.
What impresses me more about the JisuLife fan is how long its 5,000mAh battery keeps it running. At half power, which we find is strong enough to cool us down on even the hottest days, the fan ran for just over 16 hours before needing a charge. That’s far longer than my son lasted at the water park. For comparison, Dyson estimates the HushJet Mini Cool will run for up to six hours at its lowest setting, and at full power, I had it die after just over an hour.
I haven’t tested the even pricier Shark ChillPill that combines a fan with a metal cooling plate the company claims can lower skin temperature by up to 16 degrees Fahrenheit in seconds. You can cool down by pressing it all over your body, but it only cools for as long as the fan has power. SharkNinja estimates the ChillPill will run for up to 11 hours at its lowest setting, or just an hour-and-a-half at max power. That approach could be very effective, but I’m not spending $150 to find out.
I’ve also tested the wearable neck fans that seem to be very popular among the cashiers at my local Costco, but I didn’t find them to be as effective as I’d hoped. The breeze is spread out across the length of the fan and doesn’t feel as intense as a handheld fan, and wearing it positions the motor right below your ear at all times, so it’s a constant drone. I see why they’re useful, but it’s not an experience anyone in my family enjoyed.
After a successful summer with these fans, I’m already keeping an eye out for sales on other JisuLife models, including a hands-free version you wear hanging from your neck. But I’m also expecting these cheaper alternatives will continue to be the first thing we pack when heading out on adventures for the rest of the summer and probably for years to come.
Photography by Andrew Liszewski / The Verge
Follow topics and authors from this story to see more like this in your personalized homepage feed and to receive email updates.
At the start of the summer, I impulse-purchased a pair of JisuLife Life10 S fans from Costco, which at CDN $25 each (or $32.99 through Amazon), are among the most basic offerings from the company. JisuLife’s extensive lineup includes some fan models costing close to $100 with features like reverse-charging to power your phone and 100 different speed settings. I want all those features, but my goal was to not spend several hundred dollars on personal cooling devices that could easily go missing or get damaged during the chaos of summer activities.
On the back of the fan is a USB-C charging port and a sliding power switch that prevents the fan from accidentally turning on while it’s being jostled around inside a bag.
The Life10 S’ functionality is comparatively basic, but also easy to use. A sliding power switch on the back prevents it from accidentally turning on while banging around inside a backpack, and a single button on the front cycles through five different fan speeds. There’s also a basic LCD display showing the battery’s remaining charge when the fan is first powered on and the current speed setting. It’s simple, but the Life10 S does its one job quietly and for a surprisingly long time.
A single button cycles through the fan’s five different speed settings.
When Dyson announced its first handheld fan in April, I assumed the company that had developed an expertise in moving air had created a personal cooling device that would outperform everything else on the market. My spouse loves their Dyson hair dryer, and I was sure the HushJet Mini Cool would be my secret weapon for surviving hot and humid summers, even if at $99 it was a splurge. But having used both Dyson’s personal fan and JisuLife’s $25 alternative, I only reach for the latter when braving the world without AC.
The basic LCD display on the front of the fan is sometimes hard to see because it’s hidden behind a reflective black cover, but the fan is easy to use without being able to see it.
Dyson’s HushJet Mini Cool wraps impressive engineering in an eye-catching design, and at its highest setting, it easily out blasts JisuLife’s even with the Life10 S set to full power. But even at its lowest setting, the HushJet is loud with a high-pitched whine reminiscent of Dyson’s vacuums. I don’t mind that sound when it’s limited to short bursts of cleaning at ground level, but not when coming from a tiny fan designed to be used close to your face and ears. The JisuLife fan produces sound at a much lower frequency, making it easier to tolerate for hours, even if it’s far from whisper quiet at full power.
What impresses me more about the JisuLife fan is how long its 5,000mAh battery keeps it running. At half power, which we find is strong enough to cool us down on even the hottest days, the fan ran for just over 16 hours before needing a charge. That’s far longer than my son lasted at the water park. For comparison, Dyson estimates the HushJet Mini Cool will run for up to six hours at its lowest setting, and at full power, I had it die after just over an hour.
I haven’t tested the even pricier Shark ChillPill that combines a fan with a metal cooling plate the company claims can lower skin temperature by up to 16 degrees Fahrenheit in seconds. You can cool down by pressing it all over your body, but it only cools for as long as the fan has power. SharkNinja estimates the ChillPill will run for up to 11 hours at its lowest setting, or just an hour-and-a-half at max power. That approach could be very effective, but I’m not spending $150 to find out.
I’ve also tested the wearable neck fans that seem to be very popular among the cashiers at my local Costco, but I didn’t find them to be as effective as I’d hoped. The breeze is spread out across the length of the fan and doesn’t feel as intense as a handheld fan, and wearing it positions the motor right below your ear at all times, so it’s a constant drone. I see why they’re useful, but it’s not an experience anyone in my family enjoyed.
After a successful summer with these fans, I’m already keeping an eye out for sales on other JisuLife models, including a hands-free version you wear hanging from your neck. But I’m also expecting these cheaper alternatives will continue to be the first thing we pack when heading out on adventures for the rest of the summer and probably for years to come.
Photography by Andrew Liszewski / The Verge
Follow topics and authors from this story to see more like this in your personalized homepage feed and to receive email updates.
Andrew Liszewski
#dont #splurge #expensive #handheld #fan #beat #heatDeals,Gadgets,Hands-on,Reviews,Tech,Verge Shopping">You don’t need to splurge on an expensive handheld fan to beat the heat
Despite what influencers may say, you don’t need to spend $99.99 on Dyson’s HushJet Mini Cool or $149.99 for the Shark ChillPill to survive the summer whenever you leave the comfort of air-conditioning. My family has found all the comfort it needs to survive humid baseball games, sweltering concerts, and sweaty hikes with a couple of affordable handheld fans from a Chinese company called JisuLife that has spent the past decade honing its hardware.
At the start of the summer, I impulse-purchased a pair of JisuLife Life10 S fans from Costco, which at CDN $25 each (or $32.99 through Amazon), are among the most basic offerings from the company. JisuLife’s extensive lineup includes some fan models costing close to $100 with features like reverse-charging to power your phone and 100 different speed settings. I want all those features, but my goal was to not spend several hundred dollars on personal cooling devices that could easily go missing or get damaged during the chaos of summer activities.
On the back of the fan is a USB-C charging port and a sliding power switch that prevents the fan from accidentally turning on while it’s being jostled around inside a bag.
The Life10 S’ functionality is comparatively basic, but also easy to use. A sliding power switch on the back prevents it from accidentally turning on while banging around inside a backpack, and a single button on the front cycles through five different fan speeds. There’s also a basic LCD display showing the battery’s remaining charge when the fan is first powered on and the current speed setting. It’s simple, but the Life10 S does its one job quietly and for a surprisingly long time.
A single button cycles through the fan’s five different speed settings.
When Dyson announced its first handheld fan in April, I assumed the company that had developed an expertise in moving air had created a personal cooling device that would outperform everything else on the market. My spouse loves their Dyson hair dryer, and I was sure the HushJet Mini Cool would be my secret weapon for surviving hot and humid summers, even if at $99 it was a splurge. But having used both Dyson’s personal fan and JisuLife’s $25 alternative, I only reach for the latter when braving the world without AC.
The basic LCD display on the front of the fan is sometimes hard to see because it’s hidden behind a reflective black cover, but the fan is easy to use without being able to see it.
Dyson’s HushJet Mini Cool wraps impressive engineering in an eye-catching design, and at its highest setting, it easily out blasts JisuLife’s even with the Life10 S set to full power. But even at its lowest setting, the HushJet is loud with a high-pitched whine reminiscent of Dyson’s vacuums. I don’t mind that sound when it’s limited to short bursts of cleaning at ground level, but not when coming from a tiny fan designed to be used close to your face and ears. The JisuLife fan produces sound at a much lower frequency, making it easier to tolerate for hours, even if it’s far from whisper quiet at full power.
What impresses me more about the JisuLife fan is how long its 5,000mAh battery keeps it running. At half power, which we find is strong enough to cool us down on even the hottest days, the fan ran for just over 16 hours before needing a charge. That’s far longer than my son lasted at the water park. For comparison, Dyson estimates the HushJet Mini Cool will run for up to six hours at its lowest setting, and at full power, I had it die after just over an hour.
I haven’t tested the even pricier Shark ChillPill that combines a fan with a metal cooling plate the company claims can lower skin temperature by up to 16 degrees Fahrenheit in seconds. You can cool down by pressing it all over your body, but it only cools for as long as the fan has power. SharkNinja estimates the ChillPill will run for up to 11 hours at its lowest setting, or just an hour-and-a-half at max power. That approach could be very effective, but I’m not spending $150 to find out.
I’ve also tested the wearable neck fans that seem to be very popular among the cashiers at my local Costco, but I didn’t find them to be as effective as I’d hoped. The breeze is spread out across the length of the fan and doesn’t feel as intense as a handheld fan, and wearing it positions the motor right below your ear at all times, so it’s a constant drone. I see why they’re useful, but it’s not an experience anyone in my family enjoyed.
After a successful summer with these fans, I’m already keeping an eye out for sales on other JisuLife models, including a hands-free version you wear hanging from your neck. But I’m also expecting these cheaper alternatives will continue to be the first thing we pack when heading out on adventures for the rest of the summer and probably for years to come.
Photography by Andrew Liszewski / The Verge
Follow topics and authors from this story to see more like this in your personalized homepage feed and to receive email updates.
Early in “King of the Hill” Season 15 — or, if you prefer, the second…
I first slipped on Halliday’s original smart glasses at CES 2025. I was not a fan. The glasses had a tiny, movable display window embedded into the frame that was incredibly finicky to see, and my 30-minute demo left me with achy eyeballs. It was an interesting concept with terrible execution, especially compared to the several other smart glasses on the show floor. So I was skeptical when a few weeks ago, Halliday reached out to say its second attempt at smart glasses was much better.
Well, having tried the Halliday Gen 2, I’m happy to report these are better glasses. That secret display window is gone, replaced by more traditional but discreet waveguides. They’re not like the Meta Display’s nigh-invisible screens. You can still spot the reflection if angled just right, but they’re considerably easier to see. And inside of a single-lens display, the Gen 2 has one for each eye, giving you a much larger screen to look at. Spec-wise, the Gen 2’s displays are monochrome green, with a maximum brightness of 1,600 nits and 600 by 300 pixel resolution per eye.
On my face, the Gen 2 has a nondescript design but is very lightweight compared to other display glasses I’ve tried. The display was also easily visible inside a dark bar, though I didn’t get a chance to see how it’d fare in direct sunlight. The four-mic array was able to pick up commands despite the ambient noise, and Halliday told me that it gets about 12 hours of typical use. That’s partly because these aren’t camera glasses. The exclusion of the camera was a deliberate choice, both for privacy and to extend battery life. That’s because these are more so meant to be a tool for work meetings.
With the Gen 2, Halliday is launching a feature called Meeting Flow. It’s meant to help you follow along in a conversation, using AI to surface context or facts without needing to look at your laptop or phone. I’ve seen this in other smart glasses to varying degrees of success. (Mostly non-success.) More interesting are the so-called Thread Tracker, Decision Confirmation, and Commitment Check features. The idea is to provide real-time updates about what decisions have been made in a meeting, what items need following up on, and a visualization of a meeting’s overall conversation flow. For example, Thread Tracker might show that a team meeting started off talking about budget allocations, before moving on to potential new hires and timelines for those hires. Decision Confirmation might show that the meeting concluded that all new hires should be finished by a specific date. Lastly, Commitment Check verifies if action items have been assigned (and to whom) with a clear deadline. The glasses will also provide post-meeting transcripts and summaries.
I saw a brief glimpse of what this could look like at my demo, albeit a product interview is less conducive to these kinds of features than a typical planning meeting. That said, the glasses also support more general-use AI features like captioning, real-time translations for over 45 languages, the ability to take phone calls, and teleprompters/notecards for public speakers. Users can also make use of the Halliday AI assistant for voice control.
Overall, this is a much more tightly focused vision for a pair of smart glasses than Halliday’s original glasses. That said, we’ll have to see if the AI features are all that useful. So far, I’ve had little success with AI wearables successfully intuiting what I actually need surfaced in a conversation, or deriving the correct conclusions for to-do items. And at $599, the Gen 2 comes with a pretty steep price tag for the average person. That’s not including any extra costs for prescription lenses. (Halliday claims it’ll be able to handle my prescription, which is -10 in one eye and -8.75 in the other with monster astigmatism. We shall see!)
The Halliday Gen 2 are available for preorder starting today with a $10 deposit and a subsequent $100 discount on the final price. The glasses are expected to ship in September.
I first slipped on Halliday’s original smart glasses at CES 2025. I was not a fan. The glasses had a tiny, movable display window embedded into the frame that was incredibly finicky to see, and my 30-minute demo left me with achy eyeballs. It was an interesting concept with terrible execution, especially compared to the several other smart glasses on the show floor. So I was skeptical when a few weeks ago, Halliday reached out to say its second attempt at smart glasses was much better.
Well, having tried the Halliday Gen 2, I’m happy to report these are better glasses. That secret display window is gone, replaced by more traditional but discreet waveguides. They’re not like the Meta Display’s nigh-invisible screens. You can still spot the reflection if angled just right, but they’re considerably easier to see. And inside of a single-lens display, the Gen 2 has one for each eye, giving you a much larger screen to look at. Spec-wise, the Gen 2’s displays are monochrome green, with a maximum brightness of 1,600 nits and 600 by 300 pixel resolution per eye.
On my face, the Gen 2 has a nondescript design but is very lightweight compared to other display glasses I’ve tried. The display was also easily visible inside a dark bar, though I didn’t get a chance to see how it’d fare in direct sunlight. The four-mic array was able to pick up commands despite the ambient noise, and Halliday told me that it gets about 12 hours of typical use. That’s partly because these aren’t camera glasses. The exclusion of the camera was a deliberate choice, both for privacy and to extend battery life. That’s because these are more so meant to be a tool for work meetings.
With the Gen 2, Halliday is launching a feature called Meeting Flow. It’s meant to help you follow along in a conversation, using AI to surface context or facts without needing to look at your laptop or phone. I’ve seen this in other smart glasses to varying degrees of success. (Mostly non-success.) More interesting are the so-called Thread Tracker, Decision Confirmation, and Commitment Check features. The idea is to provide real-time updates about what decisions have been made in a meeting, what items need following up on, and a visualization of a meeting’s overall conversation flow. For example, Thread Tracker might show that a team meeting started off talking about budget allocations, before moving on to potential new hires and timelines for those hires. Decision Confirmation might show that the meeting concluded that all new hires should be finished by a specific date. Lastly, Commitment Check verifies if action items have been assigned (and to whom) with a clear deadline. The glasses will also provide post-meeting transcripts and summaries.
I saw a brief glimpse of what this could look like at my demo, albeit a product interview is less conducive to these kinds of features than a typical planning meeting. That said, the glasses also support more general-use AI features like captioning, real-time translations for over 45 languages, the ability to take phone calls, and teleprompters/notecards for public speakers. Users can also make use of the Halliday AI assistant for voice control.
Overall, this is a much more tightly focused vision for a pair of smart glasses than Halliday’s original glasses. That said, we’ll have to see if the AI features are all that useful. So far, I’ve had little success with AI wearables successfully intuiting what I actually need surfaced in a conversation, or deriving the correct conclusions for to-do items. And at $599, the Gen 2 comes with a pretty steep price tag for the average person. That’s not including any extra costs for prescription lenses. (Halliday claims it’ll be able to handle my prescription, which is -10 in one eye and -8.75 in the other with monster astigmatism. We shall see!)
The Halliday Gen 2 are available for preorder starting today with a $10 deposit and a subsequent $100 discount on the final price. The glasses are expected to ship in September.
I first slipped on Halliday’s original smart glasses at CES 2025. I was not a fan. The glasses had a tiny, movable display window embedded into the frame that was incredibly finicky to see, and my 30-minute demo left me with achy eyeballs. It was an interesting concept with terrible execution, especially compared to the several other smart glasses on the show floor. So I was skeptical when a few weeks ago, Halliday reached out to say its second attempt at smart glasses was much better.
Well, having tried the Halliday Gen 2, I’m happy to report these are better glasses. That secret display window is gone, replaced by more traditional but discreet waveguides. They’re not like the Meta Display’s nigh-invisible screens. You can still spot the reflection if angled just right, but they’re considerably easier to see. And inside of a single-lens display, the Gen 2 has one for each eye, giving you a much larger screen to look at. Spec-wise, the Gen 2’s displays are monochrome green, with a maximum brightness of 1,600 nits and 600 by 300 pixel resolution per eye.
On my face, the Gen 2 has a nondescript design but is very lightweight compared to other display glasses I’ve tried. The display was also easily visible inside a dark bar, though I didn’t get a chance to see how it’d fare in direct sunlight. The four-mic array was able to pick up commands despite the ambient noise, and Halliday told me that it gets about 12 hours of typical use. That’s partly because these aren’t camera glasses. The exclusion of the camera was a deliberate choice, both for privacy and to extend battery life. That’s because these are more so meant to be a tool for work meetings.
With the Gen 2, Halliday is launching a feature called Meeting Flow. It’s meant to help you follow along in a conversation, using AI to surface context or facts without needing to look at your laptop or phone. I’ve seen this in other smart glasses to varying degrees of success. (Mostly non-success.) More interesting are the so-called Thread Tracker, Decision Confirmation, and Commitment Check features. The idea is to provide real-time updates about what decisions have been made in a meeting, what items need following up on, and a visualization of a meeting’s overall conversation flow. For example, Thread Tracker might show that a team meeting started off talking about budget allocations, before moving on to potential new hires and timelines for those hires. Decision Confirmation might show that the meeting concluded that all new hires should be finished by a specific date. Lastly, Commitment Check verifies if action items have been assigned (and to whom) with a clear deadline. The glasses will also provide post-meeting transcripts and summaries.
I saw a brief glimpse of what this could look like at my demo, albeit a product interview is less conducive to these kinds of features than a typical planning meeting. That said, the glasses also support more general-use AI features like captioning, real-time translations for over 45 languages, the ability to take phone calls, and teleprompters/notecards for public speakers. Users can also make use of the Halliday AI assistant for voice control.
Overall, this is a much more tightly focused vision for a pair of smart glasses than Halliday’s original glasses. That said, we’ll have to see if the AI features are all that useful. So far, I’ve had little success with AI wearables successfully intuiting what I actually need surfaced in a conversation, or deriving the correct conclusions for to-do items. And at $599, the Gen 2 comes with a pretty steep price tag for the average person. That’s not including any extra costs for prescription lenses. (Halliday claims it’ll be able to handle my prescription, which is -10 in one eye and -8.75 in the other with monster astigmatism. We shall see!)
The Halliday Gen 2 are available for preorder starting today with a $10 deposit and a subsequent $100 discount on the final price. The glasses are expected to ship in September.
Naturally, the AstroRinse also needs a power supply, so if you don’t have a standard electrical outlet near your hose spigot, you’ll need another extension cord solution here. The unit must be level to run properly, and it features adjustable feet and a built-in spirit level to help you achieve that.
All told, you’ll need to carefully consider where you’re going to place the AstroRinse, ensuring you have access to water, power, and drainage—and that the location isn’t too far from the pool. Since the AquaSense X robot itself weighs 29 pounds (and more when freshly pulled from the water), you probably don’t want to haul the thing halfway across the yard to clean and charge it. Unfortunately, given the availability of the above three services in my backyard, that’s exactly what I had to do.
A Familiar Friend in the Water
The Beatbot AquaSense X robot is nearly identical in appearance to the Beatbot AquaSense 2 Ultra except for some changes to the basket design (which is a single piece here instead of two). Setting it up is far simpler than the AstroRinse.
Physical configuration involves installing two side brushes—these are used only by the skimmer function—but this is a fairly quick affair. Once the brushes are attached, the robot must be set on top of the AstroRinse cleaner so the two devices can be wirelessly paired together. (The quick start guide lays out the particular button presses you must do to complete this process; don’t lose it.) Lastly, the system must then be paired to the Beatbot mobile app; you’ll need Bluetooth and a 2.4 GHz or 5 GHz Wi-Fi connection to complete this task. One tiny hiccup I encountered: After completing all this work, both devices downloaded firmware updates, which promptly broke their pairing connection. It was easy to reestablish, however, by simply repeating the pairing process.
Video: Chris Null
After a full charge, I put the cleaner through its paces in the pool on both the floor and the surface, and as expected, I saw no real difference in performance against the AquaSense 2 Ultra. During floor testing with both organic and synthetic debris, the device picked up an average of 97 percent of the test material, doing exceptionally well on steps and platforms. On the surface, the unit was predictably middling to awful, collecting less than half of floating debris and sinking most of the rest. The unit is just too slow to collect much material on the surface, even though its spinning side brushes help, to a small extent, to pull leaves into its maw.
On the floor of the pool, maximum running time is about 41/2 hours, courtesy of a 13,400 mAh battery—the same as the battery on the AquaSense 2 Ultra.
ScreenshotBeatbot app via Chris Null
As with other AquaSense robots, a bevy of operating modes are available in the Beatbot app, letting you choose from dozens of potential combinations of floor, wall, waterline, and surface cleaning, each with up to two runs per zone and with various running times. An AI Quick Mode activates the onboard camera to allow the robot to actively search for debris instead of encountering it randomly; it’s good for a quick clean when there’s not much to pick up but more than you can easily fetch with a net.
Again, not much of this is any different from how the AquaSense 2 Ultra behaves, and aside from the poor surface performance, it works outstandingly well.
Charging and Cleaning
On to the main event: cleanup. After each run, the AquaSense X parked itself at the waterline to await retrieval, and I dutifully lugged it across the pool deck to where I had the AstroRinse station set up. While it can take a little trial and error to get the robot seated in just the right spot, once you do, the cleaning system kicks in automatically within a few seconds.
Video: Chris Null
As the rinsing system starts up, the top-mounted arm swings into place and connects with the mouth the robot uses for surface skimming. Then, a high-pressure stream of water (sounding quite loud) begins blasting from the arm and into the filter basket, which is positioned directly below this opening. The water spray runs uninterrupted for three minutes before the arm swings back and the system shuts off. (A quick mode, which runs for one minute, can also be selected in the app.) After that, the arm retracts and the unit is done. Debris is captured in a net-covered basket built into the base of the cleaning station. Any remaining water drains out through a mesh screen at the very bottom of the unit.
Physical configuration involves installing two side brushes—these are used only by the skimmer function—but this is a fairly quick affair. Once the brushes are attached, the robot must be set on top of the AstroRinse cleaner so the two devices can be wirelessly paired together. (The quick start guide lays out the particular button presses you must do to complete this process; don’t lose it.) Lastly, the system must then be paired to the Beatbot mobile app; you’ll need Bluetooth and a 2.4 GHz or 5 GHz Wi-Fi connection to complete this task. One tiny hiccup I encountered: After completing all this work, both devices downloaded firmware updates, which promptly broke their pairing connection. It was easy to reestablish, however, by simply repeating the pairing process.
Video: Chris Null
After a full charge, I put the cleaner through its paces in the pool on both the floor and the surface, and as expected, I saw no real difference in performance against the AquaSense 2 Ultra. During floor testing with both organic and synthetic debris, the device picked up an average of 97 percent of the test material, doing exceptionally well on steps and platforms. On the surface, the unit was predictably middling to awful, collecting less than half of floating debris and sinking most of the rest. The unit is just too slow to collect much material on the surface, even though its spinning side brushes help, to a small extent, to pull leaves into its maw.
On the floor of the pool, maximum running time is about 41/2 hours, courtesy of a 13,400 mAh battery—the same as the battery on the AquaSense 2 Ultra.
ScreenshotBeatbot app via Chris Null
As with other AquaSense robots, a bevy of operating modes are available in the Beatbot app, letting you choose from dozens of potential combinations of floor, wall, waterline, and surface cleaning, each with up to two runs per zone and with various running times. An AI Quick Mode activates the onboard camera to allow the robot to actively search for debris instead of encountering it randomly; it’s good for a quick clean when there’s not much to pick up but more than you can easily fetch with a net.
Again, not much of this is any different from how the AquaSense 2 Ultra behaves, and aside from the poor surface performance, it works outstandingly well.
Charging and Cleaning
On to the main event: cleanup. After each run, the AquaSense X parked itself at the waterline to await retrieval, and I dutifully lugged it across the pool deck to where I had the AstroRinse station set up. While it can take a little trial and error to get the robot seated in just the right spot, once you do, the cleaning system kicks in automatically within a few seconds.
Video: Chris Null
As the rinsing system starts up, the top-mounted arm swings into place and connects with the mouth the robot uses for surface skimming. Then, a high-pressure stream of water (sounding quite loud) begins blasting from the arm and into the filter basket, which is positioned directly below this opening. The water spray runs uninterrupted for three minutes before the arm swings back and the system shuts off. (A quick mode, which runs for one minute, can also be selected in the app.) After that, the arm retracts and the unit is done. Debris is captured in a net-covered basket built into the base of the cleaning station. Any remaining water drains out through a mesh screen at the very bottom of the unit.
Photograph: Chris Null
#Pool #Robot #Cleans #Pooland #Cleansshopping,review,reviews,robots,home,outdoors">This Pool Robot Cleans the Pool—and Then Cleans Itself
Photograph: Chris Null
Naturally, the AstroRinse also needs a power supply, so if you don’t have a standard electrical outlet near your hose spigot, you’ll need another extension cord solution here. The unit must be level to run properly, and it features adjustable feet and a built-in spirit level to help you achieve that.
All told, you’ll need to carefully consider where you’re going to place the AstroRinse, ensuring you have access to water, power, and drainage—and that the location isn’t too far from the pool. Since the AquaSense X robot itself weighs 29 pounds (and more when freshly pulled from the water), you probably don’t want to haul the thing halfway across the yard to clean and charge it. Unfortunately, given the availability of the above three services in my backyard, that’s exactly what I had to do.
A Familiar Friend in the Water
The Beatbot AquaSense X robot is nearly identical in appearance to the Beatbot AquaSense 2 Ultra except for some changes to the basket design (which is a single piece here instead of two). Setting it up is far simpler than the AstroRinse.
Physical configuration involves installing two side brushes—these are used only by the skimmer function—but this is a fairly quick affair. Once the brushes are attached, the robot must be set on top of the AstroRinse cleaner so the two devices can be wirelessly paired together. (The quick start guide lays out the particular button presses you must do to complete this process; don’t lose it.) Lastly, the system must then be paired to the Beatbot mobile app; you’ll need Bluetooth and a 2.4 GHz or 5 GHz Wi-Fi connection to complete this task. One tiny hiccup I encountered: After completing all this work, both devices downloaded firmware updates, which promptly broke their pairing connection. It was easy to reestablish, however, by simply repeating the pairing process.
Video: Chris Null
After a full charge, I put the cleaner through its paces in the pool on both the floor and the surface, and as expected, I saw no real difference in performance against the AquaSense 2 Ultra. During floor testing with both organic and synthetic debris, the device picked up an average of 97 percent of the test material, doing exceptionally well on steps and platforms. On the surface, the unit was predictably middling to awful, collecting less than half of floating debris and sinking most of the rest. The unit is just too slow to collect much material on the surface, even though its spinning side brushes help, to a small extent, to pull leaves into its maw.
On the floor of the pool, maximum running time is about 41/2 hours, courtesy of a 13,400 mAh battery—the same as the battery on the AquaSense 2 Ultra.
ScreenshotBeatbot app via Chris Null
As with other AquaSense robots, a bevy of operating modes are available in the Beatbot app, letting you choose from dozens of potential combinations of floor, wall, waterline, and surface cleaning, each with up to two runs per zone and with various running times. An AI Quick Mode activates the onboard camera to allow the robot to actively search for debris instead of encountering it randomly; it’s good for a quick clean when there’s not much to pick up but more than you can easily fetch with a net.
Again, not much of this is any different from how the AquaSense 2 Ultra behaves, and aside from the poor surface performance, it works outstandingly well.
Charging and Cleaning
On to the main event: cleanup. After each run, the AquaSense X parked itself at the waterline to await retrieval, and I dutifully lugged it across the pool deck to where I had the AstroRinse station set up. While it can take a little trial and error to get the robot seated in just the right spot, once you do, the cleaning system kicks in automatically within a few seconds.
Video: Chris Null
As the rinsing system starts up, the top-mounted arm swings into place and connects with the mouth the robot uses for surface skimming. Then, a high-pressure stream of water (sounding quite loud) begins blasting from the arm and into the filter basket, which is positioned directly below this opening. The water spray runs uninterrupted for three minutes before the arm swings back and the system shuts off. (A quick mode, which runs for one minute, can also be selected in the app.) After that, the arm retracts and the unit is done. Debris is captured in a net-covered basket built into the base of the cleaning station. Any remaining water drains out through a mesh screen at the very bottom of the unit.
I’ve been testing the Hottap Go from Australia-based Joolca while vanlifing to shower after surfing and to wash up after cooking. It features a 12L integrated water tank which is an improvement on other portable showers that require an external container and long, cumbersome hose that’s easy to trip over. The Hottap Go also recirculates the water until it reaches your chosen temperature. This slows things down a bit, compared to “instant” portable showers, but it doesn’t waste water since it won’t produce an initial shock of cold water that’s usually sprayed into the ground.
The $554 Hottap Go requires an external 12V power source, but in the US Joolca sells a 12V / 5A $165 power bank that attaches magnetically to the case. In Europe I had to roll my own with an €85 (about $100) power bank found on Amazon. The result is a true, fully self-contained hot water system that can be taken anywhere.
$554
The Good
All-in-one solution for hot showers anywhere
Water tank large enough for two showers
All accessories and attachments store inside the unit
No water wasted unlike competitors
Temperature remains steady
The Bad
Very expensive
Battery is optional and attaches to the outside of the case
Have to wait a few minutes to heat up
Water pressure is just okay
To clear up any confusion right away: the Hottap Go requires electricity to power the integrated water pump and display but it heats the water with propane gas. It works with standard 1lb propane canisters out of the box, and larger tanks with a hose and regulator you must provide.
One thing I love about the Hottap Go is that the hoses, battery, showerhead, and gas canister can all be stored inside the water tank when not in use for easy portability and storage. I also like that the flow-adjustable showerhead comes with a magnetic holder. Taken together with its approach to preheating the water through recirculation, it’s clear that Joolca’s product designers have learned from the shortcomings of the current crop of portable propane showers.
To shower, you first attach the quick-release hoses for the gas and showerhead, plug the shower into a 12V power source (power bank, power station, or the cigarette plug inside your car), set your desired temperature and wait. The unit will begin heating and recirculating the water until a series of beeps indicates that the target temperature is reached. I brought tap water up to a hot 47C / 117F (per the display) in exactly four minutes, which was just enough time to gather everything I needed to shower outside my van with my modesty preserved.
My makeshift shower stall between the rear doors of my van. The Hottap Go is hot and ready to go by the time I hang the towel.
It also serves as an outdoor cleaning station to keep the messy dishes outside my living space.
The magnetic showerhead holder is super convenient. It attaches to the body of the Hottap Go or pretty much anywhere and any angle on my van.
The on/off button on the showerhead lets you conserve water as you lather. The grey dial adjusts the flow rate.
On one windy day at the beach, I noticed the Hottap Go had to keep reigniting, despite its leeward venting. It failed so often that I saw an E3 error message on the display. Repositioning the shower out of the wind kept the flame lit. The handle on top makes it easy to move, and the seal around the lid ensures that water won’t slosh onto the ground or your power bank. Otherwise, the Hottap Go always lit and stayed lit without issue during my testing.
Joolca says the Hottap Go is good for two “great showers” or a single “long, luxurious one.” I was able to take two functional yet satisfying showers from its full 12L (3.2 gal) water tank, making liberal use of the on/off switch on the showerhead to conserve water while lathering.
1/11The hoses, gas canister, showerhead, and battery all fit inside for convenient transport and storage.
Water flow is just okay, even at maximum setting. It’s strong enough to penetrate long, thick hair when shampooing but it’s not going to jettison grime from my mountain bike, for example. The magnetic holder is strong and the showerhead feels good in the hand with a nicely positioned on/off switch. Adjusting the flow rate dial is a two-handed operation, but mostly I just left it on max.
If you’ll only use it once or twice a year, then spending over $554 for the Hottap Go portable shower doesn’t make much sense, especially when tankless portable showers like BougeRV’s cost half that. I much prefer the Hottap Go’s recirculating water tank, performance, and overall convenience, though I do wish the optional $165 magnetic power bank was included in that price. Still, for vanlifers like me or anyone who regularly spends days away from plumbing, $719 can be easily justified for what could be the best portable hot water shower available.
I’ve been testing the Hottap Go from Australia-based Joolca while vanlifing to shower after surfing and to wash up after cooking. It features a 12L integrated water tank which is an improvement on other portable showers that require an external container and long, cumbersome hose that’s easy to trip over. The Hottap Go also recirculates the water until it reaches your chosen temperature. This slows things down a bit, compared to “instant” portable showers, but it doesn’t waste water since it won’t produce an initial shock of cold water that’s usually sprayed into the ground.
The $554 Hottap Go requires an external 12V power source, but in the US Joolca sells a 12V / 5A $165 power bank that attaches magnetically to the case. In Europe I had to roll my own with an €85 (about $100) power bank found on Amazon. The result is a true, fully self-contained hot water system that can be taken anywhere.
$554
The Good
All-in-one solution for hot showers anywhere
Water tank large enough for two showers
All accessories and attachments store inside the unit
No water wasted unlike competitors
Temperature remains steady
The Bad
Very expensive
Battery is optional and attaches to the outside of the case
Have to wait a few minutes to heat up
Water pressure is just okay
To clear up any confusion right away: the Hottap Go requires electricity to power the integrated water pump and display but it heats the water with propane gas. It works with standard 1lb propane canisters out of the box, and larger tanks with a hose and regulator you must provide.
One thing I love about the Hottap Go is that the hoses, battery, showerhead, and gas canister can all be stored inside the water tank when not in use for easy portability and storage. I also like that the flow-adjustable showerhead comes with a magnetic holder. Taken together with its approach to preheating the water through recirculation, it’s clear that Joolca’s product designers have learned from the shortcomings of the current crop of portable propane showers.
To shower, you first attach the quick-release hoses for the gas and showerhead, plug the shower into a 12V power source (power bank, power station, or the cigarette plug inside your car), set your desired temperature and wait. The unit will begin heating and recirculating the water until a series of beeps indicates that the target temperature is reached. I brought tap water up to a hot 47C / 117F (per the display) in exactly four minutes, which was just enough time to gather everything I needed to shower outside my van with my modesty preserved.
My makeshift shower stall between the rear doors of my van. The Hottap Go is hot and ready to go by the time I hang the towel.
It also serves as an outdoor cleaning station to keep the messy dishes outside my living space.
The magnetic showerhead holder is super convenient. It attaches to the body of the Hottap Go or pretty much anywhere and any angle on my van.
The on/off button on the showerhead lets you conserve water as you lather. The grey dial adjusts the flow rate.
On one windy day at the beach, I noticed the Hottap Go had to keep reigniting, despite its leeward venting. It failed so often that I saw an E3 error message on the display. Repositioning the shower out of the wind kept the flame lit. The handle on top makes it easy to move, and the seal around the lid ensures that water won’t slosh onto the ground or your power bank. Otherwise, the Hottap Go always lit and stayed lit without issue during my testing.
Joolca says the Hottap Go is good for two “great showers” or a single “long, luxurious one.” I was able to take two functional yet satisfying showers from its full 12L (3.2 gal) water tank, making liberal use of the on/off switch on the showerhead to conserve water while lathering.
1/11The hoses, gas canister, showerhead, and battery all fit inside for convenient transport and storage.
Water flow is just okay, even at maximum setting. It’s strong enough to penetrate long, thick hair when shampooing but it’s not going to jettison grime from my mountain bike, for example. The magnetic holder is strong and the showerhead feels good in the hand with a nicely positioned on/off switch. Adjusting the flow rate dial is a two-handed operation, but mostly I just left it on max.
If you’ll only use it once or twice a year, then spending over $554 for the Hottap Go portable shower doesn’t make much sense, especially when tankless portable showers like BougeRV’s cost half that. I much prefer the Hottap Go’s recirculating water tank, performance, and overall convenience, though I do wish the optional $165 magnetic power bank was included in that price. Still, for vanlifers like me or anyone who regularly spends days away from plumbing, $719 can be easily justified for what could be the best portable hot water shower available.
Showerhead has an integrated magnetic mount and controls to turn off the water and adjust its flow
Two-stage filter lets you use creek water
Cigarette socket power cable: 5m (16.4 ft), 12V DC
Power draw: 45W
Max temp: 60°C (140°F), pre-heats in ~5 min
Gas: 0.45 kg (1 lb) canister, ~15 showers
Gas flow rate: 20MJ/hr (18,956 BTU/hr)
Weight: 9.5 kg (20.9 lb) without water
Size: 495 x 359 x 180 mm (19.5 x 14.1 x 7.1 in), designed to fit most jerry can holders
Photos by Thomas Ricker / The Verge
Follow topics and authors from this story to see more like this in your personalized homepage feed and to receive email updates.
Thomas Ricker
#filthy #portable #showerAccessory Reviews,Reviews,Tech,Work anywhere">Are you filthy enough for a $700 portable shower?
Hot showers, like electricity, are a luxury that’s easy to take for granted. That all changes after a few nights camping at a music festival, a week toiling at a backcountry job site, or overlanding all summer in the great unknown. An itchy scalp and the vague smell of warm clams suddenly make the idea of spending hundreds on a portable shower seem less absurd.
I’ve been testing the Hottap Go from Australia-based Joolca while vanlifing to shower after surfing and to wash up after cooking. It features a 12L integrated water tank which is an improvement on other portable showers that require an external container and long, cumbersome hose that’s easy to trip over. The Hottap Go also recirculates the water until it reaches your chosen temperature. This slows things down a bit, compared to “instant” portable showers, but it doesn’t waste water since it won’t produce an initial shock of cold water that’s usually sprayed into the ground.
The $554 Hottap Go requires an external 12V power source, but in the US Joolca sells a 12V / 5A $165 power bank that attaches magnetically to the case. In Europe I had to roll my own with an €85 (about $100) power bank found on Amazon. The result is a true, fully self-contained hot water system that can be taken anywhere.
$554
The Good
All-in-one solution for hot showers anywhere
Water tank large enough for two showers
All accessories and attachments store inside the unit
No water wasted unlike competitors
Temperature remains steady
The Bad
Very expensive
Battery is optional and attaches to the outside of the case
Have to wait a few minutes to heat up
Water pressure is just okay
To clear up any confusion right away: the Hottap Go requires electricity to power the integrated water pump and display but it heats the water with propane gas. It works with standard 1lb propane canisters out of the box, and larger tanks with a hose and regulator you must provide.
One thing I love about the Hottap Go is that the hoses, battery, showerhead, and gas canister can all be stored inside the water tank when not in use for easy portability and storage. I also like that the flow-adjustable showerhead comes with a magnetic holder. Taken together with its approach to preheating the water through recirculation, it’s clear that Joolca’s product designers have learned from the shortcomings of the current crop of portable propane showers.
To shower, you first attach the quick-release hoses for the gas and showerhead, plug the shower into a 12V power source (power bank, power station, or the cigarette plug inside your car), set your desired temperature and wait. The unit will begin heating and recirculating the water until a series of beeps indicates that the target temperature is reached. I brought tap water up to a hot 47C / 117F (per the display) in exactly four minutes, which was just enough time to gather everything I needed to shower outside my van with my modesty preserved.
My makeshift shower stall between the rear doors of my van. The Hottap Go is hot and ready to go by the time I hang the towel.
It also serves as an outdoor cleaning station to keep the messy dishes outside my living space.
The magnetic showerhead holder is super convenient. It attaches to the body of the Hottap Go or pretty much anywhere and any angle on my van.
The on/off button on the showerhead lets you conserve water as you lather. The grey dial adjusts the flow rate.
On one windy day at the beach, I noticed the Hottap Go had to keep reigniting, despite its leeward venting. It failed so often that I saw an E3 error message on the display. Repositioning the shower out of the wind kept the flame lit. The handle on top makes it easy to move, and the seal around the lid ensures that water won’t slosh onto the ground or your power bank. Otherwise, the Hottap Go always lit and stayed lit without issue during my testing.
Joolca says the Hottap Go is good for two “great showers” or a single “long, luxurious one.” I was able to take two functional yet satisfying showers from its full 12L (3.2 gal) water tank, making liberal use of the on/off switch on the showerhead to conserve water while lathering.
1/11The hoses, gas canister, showerhead, and battery all fit inside for convenient transport and storage.
Water flow is just okay, even at maximum setting. It’s strong enough to penetrate long, thick hair when shampooing but it’s not going to jettison grime from my mountain bike, for example. The magnetic holder is strong and the showerhead feels good in the hand with a nicely positioned on/off switch. Adjusting the flow rate dial is a two-handed operation, but mostly I just left it on max.
If you’ll only use it once or twice a year, then spending over $554 for the Hottap Go portable shower doesn’t make much sense, especially when tankless portable showers like BougeRV’s cost half that. I much prefer the Hottap Go’s recirculating water tank, performance, and overall convenience, though I do wish the optional $165 magnetic power bank was included in that price. Still, for vanlifers like me or anyone who regularly spends days away from plumbing, $719 can be easily justified for what could be the best portable hot water shower available.